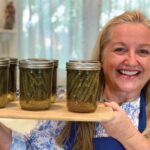
Crisp Pickled Green Beans
Learn how to make Crisp Pickled Green Beans. Plus, learn how to water bath can these green beans if you want to make them shelf-stable for long-term storage.
Servings: 6 Pints
Equipment
- 6 pint-sized jars with lids or 6 pint-sized canning jars
- Ladle
- Debubbler or butter knife, optional
- Magnetized lid lifter, optional
- Canning lids and rings, optional
- Water bath canner, optional
- Jar lifter, optional
- Drying mat or 2 dish towels, optional
Ingredients
- 3 1/2 pounds Fresh green beans, washed with stems removed
- 5 cups White vinegar, 5% acidity
- 2 cups Water
- 1/3 cup Pickling and canning salt
- 1 1/2 tsp Crushed red pepper flakes, optional
- 12 sprigs Fresh dill, optional
- 3/4 tsp "Pickle Crisp", optional Use if water bath canning.
Instructions
- Wash green beans and trim the stem ends. You can also trim the tails, but it is not necessary.
- Combine vinegar, water, and salt into a non-reactive saucepan (stainless steel or enameled). Add red pepper flakes, if using. Place the saucepan on the stovetop and bring the mixture to a boil. This is your pickling brine.
- Place 2 sprigs of fresh dill, if using, into clean pint-sized jars. Pack each jar tightly with 4" green beans. (In the video, I show you how I keep my jars clean and waiting in my water bath canner until I am ready to use them since the jars need to be hot for canning.)
- Ladle hot pickling brine into the jars. You'll want to cover the green beans and leave a 1/2 inch headspace below the rim of the jar. (In the video, I show you how to use the debubbler to measure the headspace in a jar.)
- If you are not canning your pickled green beans, allow each jar to cool to room temperature, which will take approximately 1 hour. Afterward, put a lid on each jar and refrigerate the jars of pickled green beans. Allow the pickled green beans to chill for at least 4 hours, but overnight is better to allow the green beans to fully absorb the pickling brine. For best flavor, consume your refrigerated jars within 3 months.
- If you are water bath canning your pickled green beans, add 1/8 teaspoon of pickle crisp to each jar (if using). Remove air bubbles from the jars using a knife or debubbler tool.
- Wipe each jar rim with a clean cloth dipped in vinegar. Then dry each rim with a clean, dry cloth. Place a lid on each jar and then add the ring, but tighten each ring only to finger-tip tight. (See video for the cleaning process and how to finger-tip tighten your jar lids.)
- Place each jar into the water bath canner with the simmering water and ensure the jars are underneath the water.
- Once all jars are in the water bath canner, turn the burner heat to high, bring water up to a boil, and put the lid on the canner. Once the water is at a rolling boil, set the timer and process the jars for 10 minutes. (You'll need to adjust the processing time for your altitude. See the accompanying blog post for this recipe for more information.)
- After 10 minutes, turn off the heat and remove the canner lid. Allow the jars to rest in the canner for 5 minutes. After 5 minutes, remove the jars from the canner using a jar lifter, and place the jars on a cushioned surface.
- Allow the jars to cool between 12-24 hours. Once cool, check that the canning lids have sealed completely. (In the video, you'll hear the cooling pings and see how a depressed canning lid looks.) Remove the rings and store the jars in a cool, dark place.
- Generally, canning lids guarantee that your food will stay fresh for 12-18 months, but to be sure, check your lid packaging information for freshness times.
Video
Notes
Find this recipe and video at https://marysnest.com/how-to-make-crisp-pickled-green-beans-with-optional-water-bath-canning-tutorial/
Copyright © 2021 Mary's Nest, LLC, All Rights Reserved
