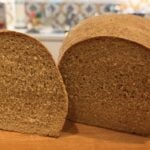
The Modern Pioneer Flagship Maslin Hearth Loaf
This variation of a Maslin Flour Blend Hearth Loaf is designed to be similar to what my mother created: a wholesome, nourishing bread made with a traditional blend of whole grains. Inspired by the time-honored methods of our ancestors, yet simplified for today's kitchen, this recipe is forgiving, flexible, and perfect for both new and seasoned bakers alike.
Servings: 1 (9 x 5-inch or 8 1/2 x 4 1/2-inch) loaf
Equipment
- 1 9 x 5-inch or 8 1/2 x 4 1/2-inch loaf pan
- 1 Medium mixing bowl
- 1 Wooden spoon or Danish dough whisk
- 1 Measuring cups and spoons for both dry and liquid measures
- 1 Clean, lightweight kitchen towel (such as a flour sack towel) or alternative cover
- 1 Shallow oven-safe pan
- 1 Wire cooling rack
Ingredients
For the Maslin Flour Blend
- 3 1/2 - 4 cups whole wheat flour Hard red wheat, hard white wheat, a hard red heritage wheat such as Red Fife or Turkey Red, or any combination.
- 3/4 cup whole spelt flour
- 1/4 cup hulled barley flour (not pearled or malted) or oat flour See Baker's Notes.
For the Dough
- The Maslin Flour Blend, divided
- 1-2 tbsps sunflower lecithin, optional See Baker's Notes.
- 1-2 tbsps vital wheat gluten, optional See Baker's Notes.
- 1 1/4 - 1 1/2 cups warm water
- 1/4 cup orange juice
- 1 whole large egg
- 1-2 egg yolks See Baker's Notes.
- 1/4 cup olive oil Aa mild, buttery variety such as Arbequina. See Baker's Notes.
- 1/4 cup honey, maple syrup, or molasses
- 2 /14 tsps instant yeast Or one 0.25-ounce packet.
- 2 tsps fine-ground sea salt
- 6 ice cups
For Kneading and Preparing the Pan
- Finely milled semolina, also known as "semola rimacinata" For dusting
- Olive oil or Butter For greasing
Instructions
- Combine the Dry Ingredients. In the large mixing bowl, add 3 1/2 cups whole wheat flour and, if using, the sunflower lecithin and/or the vital wheat gluten. Whisk well to fully incorporate. (If you are using the sunflower lecithin, add only 1 tablespoon for this first loaf. If you are using vital wheat gluten, add only 1 tablespoonful for this initial loaf. After the bread is baked, you can decide if you want to add the additional tablespoons to future loaves.)
- Add the Water. Measure 1 1/4 cups of the water with the orange juice. Then add the liquid to the whole wheat flour and mix well until fully incorporated. If the mixture appears overly wet, add an additional 1 tablespoon of whole wheat flour at a time and mix well until the mixture looks like cookie dough. If the mixture appears overly dry, add 1 tablespoon of water at a time and mix well until the mixture looks like cookie dough.
- Rest Time. Allow the dough to rest, loosely covered, for 30 minutes to 1 hour, allowing the flour to start absorbing the water. This rest time, often referred to as an autolyse or short-term soaker, allows the bran to soften, making the dough easier to knead. If desired, you can use a more traditional soaker method by allowing the dough to rest, loosely covered, for 12-24 hours at room temperature, but include 1/2 teaspoon of the salt (mixed with the water and orange juice) for this rest. (The salt will help to prevent spoilage.) If, after 24 hours of a room temperature soak, you are not ready to bake, you can refrigerate the soaked flour, tightly covered, up to 3 days.
- Mix the Remaining Ingredients. In the medium bowl, whisk the remaining flours together along with the instant yeast and the salt (or the remaining salt if you used the room-temperature soaker method). Set aside. In a liquid measuring cup, add the whole egg and extra yolk(s), the olive oil, and the honey. Whisk well to combine. Sprinkle the flour, yeast, and salt mixture over the soaked whole wheat flour. Now pour the liquid mixture over the flour mixture.
- Form the Dough. Work the mixture together with your clean hands or use a wooden spoon or Danish dough whisk to stir until a soft dough begins to form. Your hands work best for this process. Continue mixing until all the ingredients are incorporated, adding additional whole wheat flour if the mixture appears overly wet (up to an additional 1/4 cup), or add additional water, a little at a time, if the mixture appears dry (up to an additional 1/4 cup). Make these additions until the dough is soft and slightly tacky but not overly sticky.
- Knead Until Smooth. Turn the dough out onto a surface lightly floured with the finely milled semolina, and knead for about 8-10 minutes (if hand kneading, this can take longer), until smooth and elastic. The dough should feel soft and smooth under your hands. During the kneading process, occasionally remove a small piece of dough and roll it into a ball in your hands. Then flatten it into a disk and begin to stretch it. If you can stretch the dough, without it tearing, to the point where it becomes transparent and light can shine through it, it has been sufficiently kneaded. This is known as the windowpane test.
- First Rise (Bulk Fermentation). Once the dough passes the windowpane test, shape all the dough into a lightly greased bowl and roll the ball around in the bowl so that it is completely coated with the oil. Cover the bowl with a piece of lightly oiled plastic wrap, a reusable food-safe "shower cap" designed for bread bowls, or a damp towel. Let rise at room temperature until it appears puffy like a pillow (it won't necessarily double in size, and the finger-poke test is not reliable with 100% whole grain dough), about 90 minutes to 3 hours, depending on your kitchen temperature. (Possibly as little as 90 minutes in a 75°F [24°C] kitchen. Possibly up to 3 hours in a 65°F [18°C] kitchen.)
- Prepare the Loaf Pan. As the dough nears the end of its first rise, grease the loaf pan generously with butter. Lightly dust with the finely milled semolina, tapping out any excess.
- Shape the Loaf. Gently deflate the dough in the bowl, and turn it out onto a surface lightly floured with the finely milled semolina. Flatten the dough into a rectangle approximately 8 by 12 inches. (Just eyeball it. This does not need to be perfect.) Fold the top two corners into the center to create a slight triangle or "house roof" shape. (This narrows the "top" of the dough, ensuring that as you roll the dough into a log, it stays uniform without bulging on the ends and will fit perfectly in the pan without crowding the ends.) Now begin to roll the dough toward you as you use your thumbs to keep the roll tight with a gentle tucking motion. This technique will create a tight log. Pinch the ends together and tuck them under slightly to create a neat loaf shape, then place the dough seam-side down into the prepared pan.
- Second Rise. Cover the loaf with the lightly oiled plastic wrap, the reusable food-safe cover, or the damp towel used to cover for the first rise. Let the loaf rise at room temperature until the dough is just about 1 inch above the pan, with the center of dough slightly higher, about 45-90 minutes, depending on your kitchen temperature. (Note the risen center of the dough is sometimes referred to as the crown.)
- Preheat the Oven. While the loaf is rising, preheat your oven to 500°F (260°C).
- Bake. Once the loaf has risen to approximately 1 inch above the rim of the loaf pan, place the loaf pan onto the middle rack of the oven. Next, add the ice cubes to the shallow, oven-safe pan and place it on the lower rack of the oven. Close the oven door, and immediately reduce the temperature to 350°F (177°C). Bake for 30–40 minutes, until the crust is a rich golden brown, but check the loaf at 15 minutes. If the loaf is beginning to brown too quickly, loosely tent it with foil. The bread is done when the internal temperature reaches about 200°F (93°C). If you do not have a thermometer, when the bread appears fully baked, remove the loaf from the oven, and then remove it from the loaf pan and tap the bottom—if it sounds hollow, it is baked through.
- Cool. Remove the bread from the loaf pan and transfer it to a wire rack to cool completely before slicing. If you slice hot 100% whole grain bread, the interior (crumb) may appear gummy. For a soft crust, rub the top of the bread, while it's still warm, with butter, and, if desired, sprinkle with salt.
- Storage. Store bread well wrapped, at room temperature for up to 3 days. Or slice and freeze, well wrapped, for up to 3 months.
Notes
• Kitchen Temperature: Dough will rise more quickly in a warm kitchen and more slowly in a cool one. Always look for the dough to appear puffy, like a pillow, rather than watching the clock. And don't stress about this. Just eyeball it!
• Flour Substitutions: If you are unable to find hulled barley flour or oat flour, you can simply replace it with an additional 1/4 cup of spelt flour with excellent results.
• Adding Sunflower Lecithin: Adding sunflower lecithin primarily serves as a powerful natural emulsifier that fixes many of the common problems associated with 100% whole wheat bread, such as crumbliness and rapid staling. If you do not add eggs to your whole grain doughs, I highly recommend using the sunflower lecithin.
• Adding Vital Wheat Gluten: Although optional, adding vital wheat gluten can be especially helpful when working with whole grain flours, as it strengthens the dough by improving its elasticity and structure, allowing the loaf to rise higher and maintain a lighter, more tender crumb.
• Adding an Egg: Adding an egg enriches the dough beautifully—the yolk, which is high in lecithin, brings richness, color, and tenderness, while the white contributes structure and stability, helping the loaf rise well and hold together for a soft yet sliceable crumb. If you do not tolerate eggs, then I highly recommend adding the sunflower lecithin.
• Adding an Egg Yolk or Two: For standard sandwich bread: Add 1 yolk. This balances the structure and softness of the bread perfectly. For a softer, more cake-like texture but less like sandwich bread: Use 2 yolks.
• Olive Oil: Arbequina is a mild, buttery-flavored olive oil that is prized for baking. You may also substitute melted butter or melted ghee for a richer flavor.
• Hydration Flexibility: Start with 1 1/4 cups of water and add more as needed. Modern-day whole grain flours, heritage wheat flours, and ancient grain flours can all vary in their ability to absorb liquid, as can freshly milled flours versus store-bought flours, so learning the feel of the dough becomes your most important guide.
• Pan Preparation: Finely milled semolina is an excellent choice for dusting because it creates a light, protective barrier that helps prevent sticking without absorbing too much moisture, so it stays pleasantly dry rather than becoming gummy during baking.
• Adding Ice Cubes to the Oven: Adding a pan with ice cubes to the oven creates a burst of steam as the bread begins to bake, and this steam plays an important role in developing the loaf. It helps keep the outer crust soft during the early stages of baking, allowing the bread to expand more fully for a better rise. As the steam dissipates, it then contributes to forming a beautifully crisp, golden crust.
• A Perfect Everyday Loaf: This bread slices beautifully, toasts well, and makes an excellent sandwich loaf.
Find this recipe and video at https://marysnest.com/how-to-bake-the-modern-pioneer-flagship-maslin-hearth-loaf/
If you’re building a traditional foods kitchen or stocking a real foods pantry, be sure to get all the books in Mary’s Modern Pioneer cookbook series, published by Penguin Random House: https://marysnest.com/modern-pioneer-cookbook-series/
For free and comprehensive lesson plans to teach traditional food recipes and kitchen techniques to students K-12, download The Modern Pioneer Cookbook Curriculum at https://marysnest.com/cookbook-curriculum/
Mary’s Nest, Mary’s Nest Cooking School, The Maslin Method, Maslin Flour Blends, and The Maslin Method Baking School are all Trademarks of Mary’s Nest, LLC.
Copyright © 2026 Mary's Nest, LLC, All Rights Reserved
QR code
Scan this QR code with your phone's camera to view this recipe on your mobile device.
