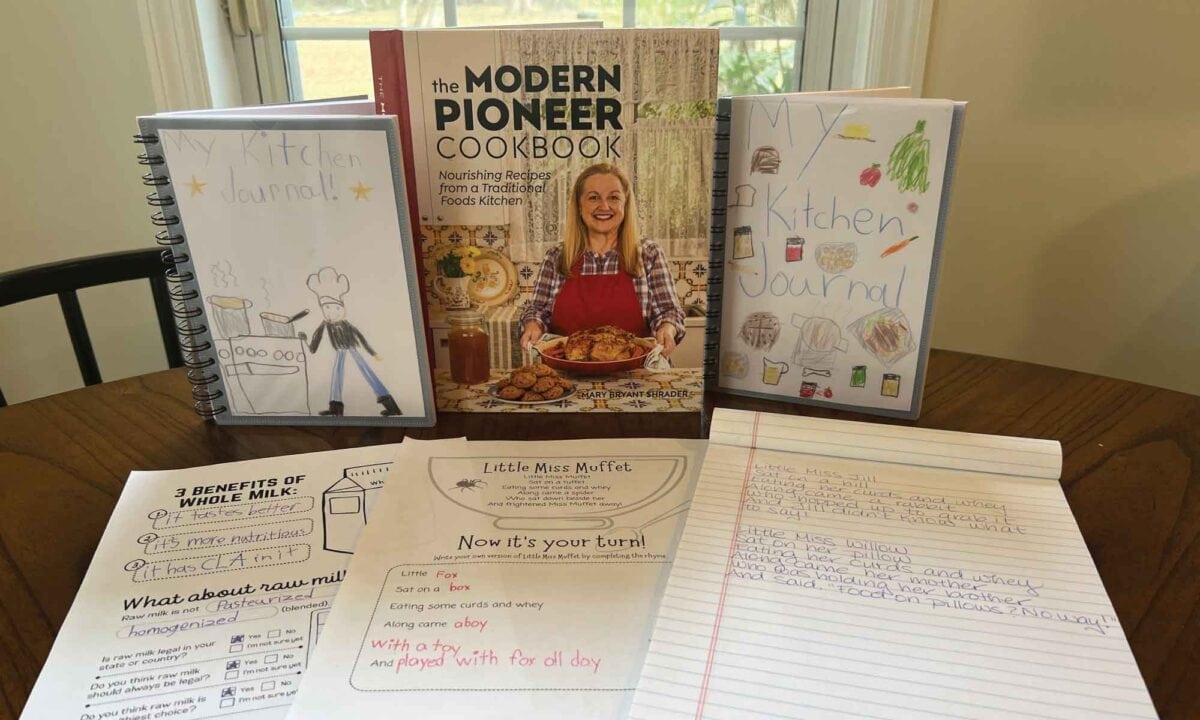
Making your own dairy at home is a rewarding and educational experience. Chapter 4 of the “Modern Pioneer Lesson Experience” guides readers through simple recipes for homemade cultured dairy, focusing on how to make cottage cheese. Whether you’re introducing young children to the basics of curds and whey or exploring the science of cultured dairy with older students, the activities in The Modern Pioneer Cookbook Curriculum make homemade dairy accessible and fun for everyone. (This lesson experience includes two activity downloads!)
Affiliates note: As an Amazon Associate I earn from qualifying purchases. My content may contain affiliate links to products and services. If you click through and make a purchase, I’ll receive a small commission. It does not affect the price you pay.
Table of Contents
About The Modern Pioneer Cookbook Curriculum Lesson Experience Series
Hi! My name is Jamie O’Hara, and I’m a homeschooling mom, curriculum writer, and former classroom teacher. I recently had the pleasure of helping Mary Bryant Shrader create The Modern Pioneer Cookbook Curriculum, which includes extensive lesson plans for grades K-12 to complement Mary’s bestselling book, The Modern Pioneer Cookbook.
- Get The Modern Pioneer Cookbook Curriculum (Free and over 250 pages!)
- Get The Modern Pioneer Cookbook
- Read The Modern Pioneer Cookbook Curriculum Lesson Experience Article Series
Now, I’m excited to embark on a journey of experiencing these lessons with my own children, ages 6 and 8 (and sometimes my 3-year-old, too). I’ll be facilitating a total of 14 lessons, one for each chapter in The Modern Pioneer Cookbook Curriculum. As we go through the curriculum, I’ll document our experience to share with all of you!
Getting Started with Homemade Dairy
In Chapter 4 of The Modern Pioneer Cookbook, we learn how to make dairy at home, including recipes for kefir, cream cheese, cultured buttermilk, and more. The table below summarizes the recipes, principles, and learning objectives for each lesson.
| Grade Band | Recipe | Traditional Kitchen Principles | Learning Goals (Students will…) |
| K-4 | Easy Stovetop Cottage Cheese | 1. Homemade food 2. Low-waste kitchens | ● Discuss the role of making dairy in a homemade, low-waste kitchen ● Define curds and whey ● Prepare cottage cheese from milk, following a recipe |
| 5-8 | Clarified Butter, Ghee, and Brown Butter | 3. Real, whole foods 4. Seasonal eating | ● Discuss how homemade dairy is an example of real, whole, seasonal food ● List the nutritional benefits of whole milk ● Prepare clarified butter, ghee, and/or brown butter, following a recipe |
| 9-12 | Homemade Yogurt | 5. Maximizing nutritional value 6. Preservation for self-sufficiency | ● Discuss how cultured dairy is an example of maximizing foods’ nutritional value and preserving food as a way to be more self-sufficient ● Describe pasteurization and homogenization ● Prepare yogurt from milk, following a recipe |
Whatever recipe you follow, the ingredients you need are easy to get at any grocery store. You’ll need lots of milk for the K-4 and 9-12 recipes and butter for the 5-8 recipes. (There are three butter recipes to choose from.)
This chapter’s lessons work well if you have students of different ages. The 9-12 lesson has an excellent science/art activity that encourages thinking about the molecules in whole milk. However, the activity is interactive and fun even for young children who may not be ready for the word “molecule.” As always, I suggest reading through all three lessons so you can mix and match in the way that makes the most sense for you and your students.
Discussion: Thinking about Dairy
To start our discussion, I asked my children to define dairy and name some dairy products. When my 3-year-old came into the kitchen, I got him involved with this part of the lesson. I invited my two older kids to bring their younger brother to collect all the toy dairy products they could find. They returned with wooden butter, a milk carton, and two cheeses. Then I asked my first-grader and third-grader to name and draw in their kitchen journals as many dairy products as they could think of.
We then talked about our favorite dairy foods (ice cream was high on the list!) and how different dairy products are made. We also discussed that most people don’t know how to make dairy products at home, but The Modern Pioneer Cookbook is helping to preserve that knowledge for future generations.
Here is a sample of discussion questions for each lesson plan:
| K-4 | 5-8 | 9-12 |
| ● Why would it be good to make more dairy products at home? ● How might it reduce kitchen waste to make dairy products at home? ● Why do you think most people buy their dairy at the store instead of making it at home? ● How much milk and dairy do you think gets wasted every day? | ● What processes do you think dairy products go through before they get to our table? ● On a carton of milk, how many ingredients do you think are listed? What about other dairy products, like cheeses, yogurts, sour cream, and ice cream? Which of these foods are real, whole foods? How do you know? | ● How does the process of culturing dairy maximize milk’s nutritional value? Why is this especially true of milk that has been pasteurized and/or homogenized? ● Why is homemade dairy important for self-sufficiency? |
Activity: Little Miss Muffet
Because the K-4 recipe for this homemade dairy chapter involves making curds and whey, it was impossible not to bring Little Miss Muffet into the lesson plan. I asked my children if they could recite the rhyme from memory. Then I asked them what curds and whey are. We had watched Mary’s video on making stovetop cottage cheese the day before, so they had seen curds and whey recently, but they still weren’t sure what they actually were.
I reminded them of the video and asked them to draw what Mary’s pot looked like when the liquid turned yellowish and chunks had formed. Then I shared the definitions of curdle, curds, and whey, asking them to write these definitions in their kitchen journals:
● Curdle: to cause to separate into lumps (curds)
● Curds: soft chunks that form when milk sours
● Whey: liquid created by curdling milk that is often strained from the curds
I asked my children if they were surprised that a young girl like Miss Muffet would be eating a bowl of curds and whey, and they said they were. They pointed out the glaring difference between what kids ate many years ago and what they eat today.

Writing Their Own Rhyme: Starting Out
At this point, I told my children that they would be writing their own versions of the Little Miss Muffet rhyme. I gave them time to brainstorm, especially my first-grader. I also wrote two of my own rhymes to model the process for them.
Writing Their Own Rhyme: Tips
If your students struggle with this, here are some tips based on my experience with this activity:
- The first two lines have to rhyme. The second line needs to end with something to sit on, so you can encourage your students to start with “What can we sit on?” and then look for names that rhyme with their choice. For example, my daughter quickly thought, “chair,” and then easily picked the rhyming name “Claire.”
- Tell your students they can use animal names for the first line. My son loves foxes, so he started with “Little Fox” and then quickly rhymed “box” for the second line.
- The fourth and fifth lines also have to rhyme. This part is where we introduce a new character who interacts with the character in the first line. When brainstorming for these lines, encourage your students to think ahead to the final line so they have a cohesive plot. Keep pointing back to the original rhyme as a guide:
Along came a spider
Who sat down beside her
And frightened Miss Muffet away
This part will probably take the longest. Allow your students enough time to come up with a few ideas and see what they like best.
- The sixth line should rhyme with “whey.” If your students are stuck, make a list of words that rhyme with “whey,” such as “day,” “say,” “away,” “hey,” etc.
- For younger students especially, you can reduce the workload by printing out the Little Miss Muffet worksheet rather than having them write everything in their kitchen journals. (See the download section below.) My first-grader started writing his rhyme in his journal but got frustrated when he made a mistake or two (because he insisted on using a marker instead of a pencil and eraser!). I gave him the worksheet and he happily completed it without feeling like he had to rewrite everything.
Building a Resilient Attitude Towards Writing
As a former writing teacher, I know firsthand that students often resist the idea of drafting and revising. However, writing is a process. If your children get frustrated that they can’t come up with an awesome rhyme right away, remind them that good writing is never perfect on the first try. This is an opportunity to instill a resilient attitude towards writing that they can build on all the way to adulthood. Some children may benefit from taking breaks, moving around, drawing, or playing while brainstorming rhyme.
Download Activity Worksheets
My daughter finished her rhyme much more quickly than my son, so we supplemented it with part of the 5-8 lesson. The activity is straightforward, asking students to read an informative section of The Modern Pioneer Cookbook and write down some facts about whole milk and raw milk. I also created a Benefits of Milk worksheet for this homemade dairy activity, which you can download here:
Activity: High School Level
The 9-12 lesson for this homemade dairy chapter is interesting because although the discussion involves advanced concepts, the activity is appropriate for even the youngest students. In the discussion, high schoolers learn about cultured dairy, pasteurization, and homogenization:
- Cultured dairy: food that is prepared by introducing live bacteria into milk
- Pasteurization: the process of heating milk and then quickly cooling it to kill bacteria
- Homogenization: the process of breaking down the cream in milk so that it no longer separates or rises to the top
Students learn to identify cultured dairy products in anticipation of making their own yogurt. They also learn a brief history of pasteurization and homogenization processes. Then, they connect the dots by learning how culturing dairy at home can counterbalance the nutrients lost to pasteurization and homogenization.
Experimenting with Milk
The 9-12 activity involves experimenting with milk molecules. Students fill a shallow dish with whole milk, add drops of food coloring, and then dip a toothpick or cotton swab into the milk to see what happens (nothing exciting). Then, they dip their toothpicks into dish soap and try again. The dish soap allows the fat molecules in the milk to move around on the surface. With the food coloring, this creates a fun design reminiscent of tie-dye.
With this hands-on activity as a learning experience, high schoolers have the opportunity to discuss molecule polarity, surfactants, and surface tension. Milk is a fascinating experimentation medium because, as a combination of water and fat, it’s both polar and nonpolar. Dish soap is a surfactant, or a molecule with a polar (hydrophilic or “water-loving”) head and a nonpolar (hydrophobic or “afraid of water”) tail. When a surfactant is added to milk, the fat moves around the surface. The food coloring allows us to see that in action.
Adapating the Activity to Younger Students
Despite the science behind it, younger students can enjoy this activity without having to learn new terminology or concepts. We can simplify it by merely pointing out that the fat in the whole milk is what we see moving around on the surface of the liquid.
My children and I didn’t have time to add this activity to our K-4 lesson, but we hope to try it in the next few days. We’ll be including our 3-year-old as well!
Recipe: Stovetop Cottage Cheese
When we finished our homemade dairy discussion and activity, we were ready to make our stovetop cottage cheese. First, I must admit that I have never been very enthusiastic about cottage cheese. When I was about my daughter’s age, I had a bad experience getting sick after my uncle made a dish with cottage cheese as a primary ingredient. (In his defense, everyone else in my large family loved it!) Since then, I’ve been hesitant to try it again.
If you have a similar hesitation, I promise you that your fresh, homemade cottage cheese will be infinitely better than anything that came from a store! Plus, cottage cheese has more protein than Greek yogurt or eggs, so it’s definitely worth trying.
Ingredients and Equipment
To get started, we gathered the ingredients and equipment we needed:
- Gallon of milk
- Cup of white vinegar
- Large pot
- Large bowl
- Colander or strainer
- Flour-sack towel
- Candy thermometer (optional)
Note: If you have a candy thermometer on hand, I recommend using it when making this recipe with young people. Watching the temperature rise on the thermometer was one of the fun parts for my kids. Plus, hands-on experience with different forms of measurement is an important part of math literacy.
Making Stovetop Cottage Cheese
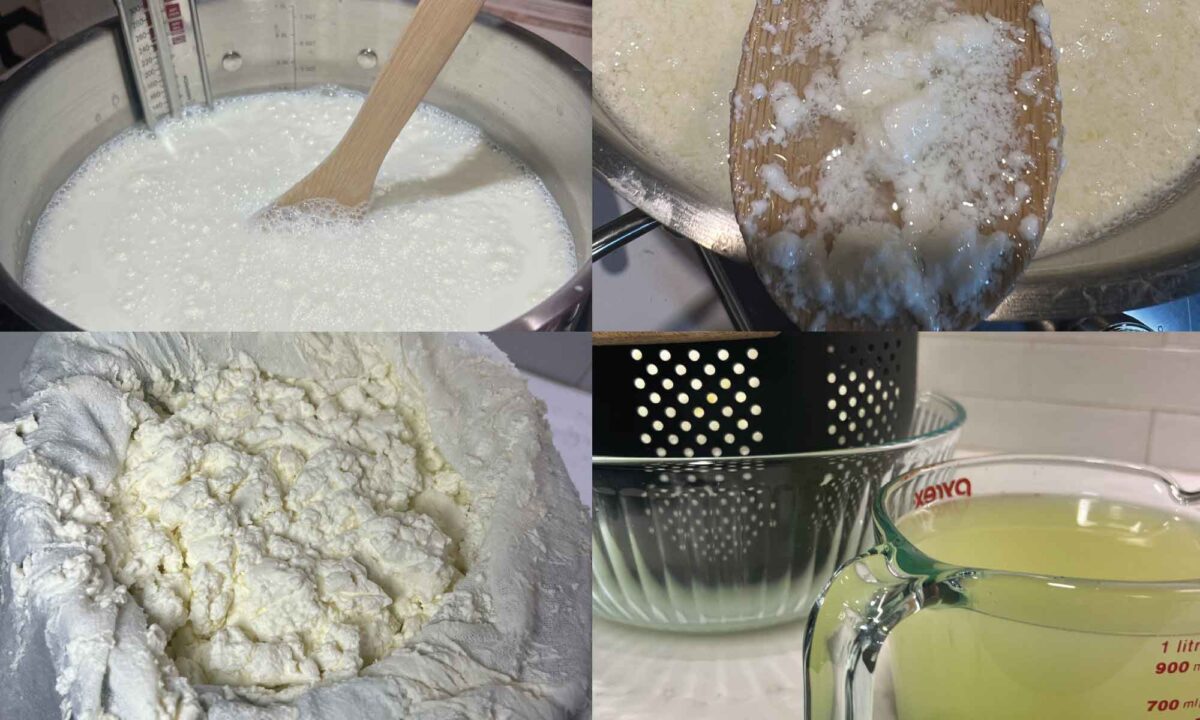
First, I had my children measure out ¾ cup vinegar so it was ready for us when we needed it. Then, they each poured a half-gallon of milk into the pot. We slowly heated the milk, stirring constantly. Once we reached 120°F (49°C), I removed the pot from the heat. My kids took turns slowly pouring in the vinegar and gently stirring. Then, we covered the pot and set a timer for 30 minutes.
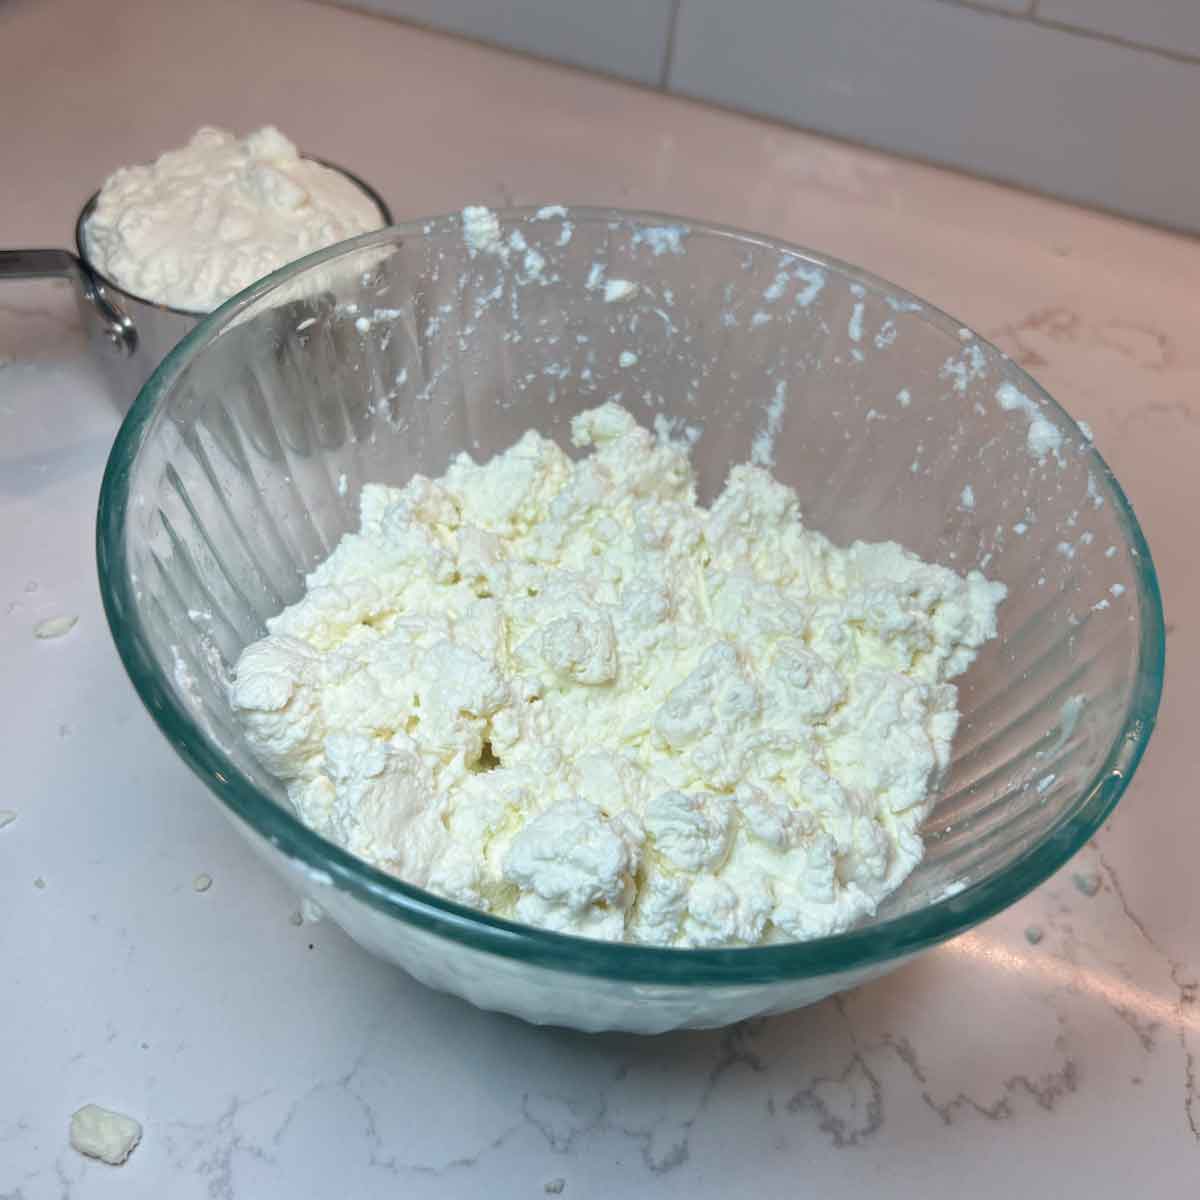
After 30 minutes, we removed the lid and checked the contents of the pot. At this point, your milk should be curdled. You’re looking for white chunks (curds) and a pale yellow liquid. Our liquid was still pretty white, so we added another ¼ cup vinegar and gently stirred for a few minutes until we got a yellower color.
Now it was time to strain. We lined a colander with a flour-sack towel (you can also use a cheesecloth) and placed it over a large bowl. I poured the big pot into the colander while my children closely observed (and got a bit splattered!). The yellow liquid whey strained through the cloth into the bowl. (You may have to empty your bowl into another container as your bowl fills up.) We left the whey to drip for about 15-20 minutes. We decided not to mix the cottage cheese with cream because we didn’t want to mimic the store-bought kind.
That’s it! As a first-time cottage cheese maker, I enjoyed how easy this homemade dairy recipe was. And don’t forget to save all the whey you separate from the curds. Acid whey is rich in vitamins and minerals, and you can use it in place of water in virtually any recipe.
Tasting Our Stovetop Cottage Cheese
All three of my children tasted the cottage cheese right away, but with different levels of enthusiasm. I offered my 3-year-old a spoonful, and he eagerly took it. As he ate it, he made one of those faces that says, “Hmm… do I like this?” He said it was good but declined a second bite. (I may reintroduce it to him with some fruit.)
After all her effort, my third-grader was excited to taste it. She liked it, even by itself. She described the flavor as “like milk, but a little sour, in a good way.” I asked her if she thought it tasted like vinegar, and she said no.
My first-grader was a little more apprehensive about tasting. He doesn’t like anything with “too much cheese,” and he doesn’t like anything with a creamy texture (ranging from alfredo sauce to avocado). The bite he took was so tiny I’m not sure he really tasted it! But he enjoyed it later for dinner.
We mixed some of the cottage cheese with egg and seasoned it. Then we layered the cottage cheese with some meat and tomato sauce and covered the whole thing with mozzarella. In other words, I used it how I’d use ricotta cheese. And it tasted so much fresher than any ricotta I’ve bought at the store.
Making Paneer
One food that all members of my family can agree on is the Indian cheese called paneer. We decided to try making paneer with some of our homemade cottage cheese.
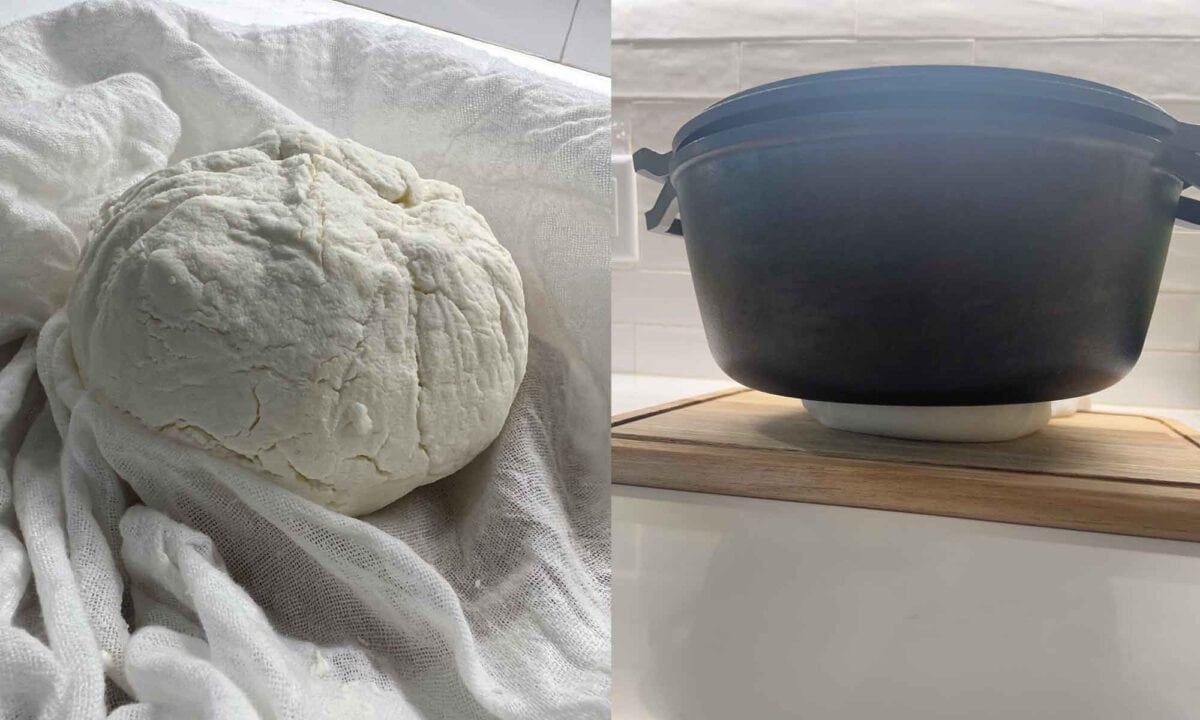
We took the extra steps of putting the cottage cheese back into a dry flour-sack towel and squeezing out any remaining whey. Then we tied it up and hung it to drip for about 30 more minutes. We squeezed again and then molded the cheese into a round patty. Wrapping it loosely in the towel, we placed a heavy cast iron pot on top to flatten it out.
After about 3 hours, the paneer is ready to be cubed and used in your favorite recipe. I really appreciate the versatility of the stovetop cottage cheese. I know we’ll be making it again!
Final Thoughts
Using my experience facilitating this homemade dairy lesson, here are my ultimate takeaways for anyone getting ready for Chapter 4:
- This recipe is easy and fun as long as you have the right supplies. If you don’t have a flour-sack towel, cheesecloth, or clean muslin cloth, don’t try to substitute a fine mesh strainer on its own.
- Use this chapter as an opportunity to work with students of different age groups at the same time. The science/art activity in the 9-12 lesson is appropriate for children of all ages.
- Don’t forget about the interdisciplinary lesson extensions at the end of each lesson plan. We’re going to return to these in a day or two when we try our milk molecule experiment.
- Finally, I suggest watching Mary’s videos with your students before getting started. It can be helpful to see exactly what the process will look like in advance.