Chapter 9 of The Modern Pioneer Cookbook Curriculum is all about traditional superfoods! Students will delve into the world of superfoods with hands-on recipes and lessons that guide them through the principles of whole, homemade, and low-waste cooking. Whether you’re teaching young children about food origins, helping middle schoolers explore nutrient density, or challenging high schoolers to maximize nutrition and self-sufficiency, this chapter experience provides an engaging framework for all ages. (This lesson experience includes six free activity downloads!)
Thanks for Your Support: This curriculum material is offered free for families, homeschoolers, co-ops, teachers, grandparents, and lifelong learners. If this resource helps your family and you would like to support the creation of future Mary’s Nest curriculum materials, consider becoming a Sweet Friend Supporter on Patreon.
Affiliates note: As an Amazon Associate I earn from qualifying purchases. My content may contain affiliate links to products and services. If you click through and make a purchase, I’ll receive a small commission. It does not affect the price you pay.
Table of Contents
- About The Modern Pioneer Cookbook Curriculum Lesson Experience Series
- Getting Started with Superfoods
- Discussion: Superfoods
- K-4 Activity: How Nuggets Are Made
- 5-8 Activity: Scavenger Hunt and Menu Planning
- 9-12 Activity: Nutrient-Dense and Nutrient Rich
- Recipe: Beef Liver Nuggets
- Tasting: Liver Nuggets
- Where To Buy Beef Liver
- Final Thoughts
- The Modern Pioneer Pantry
About The Modern Pioneer Cookbook Curriculum Lesson Experience Series
Hi! My name is Jamie O’Hara, and I’m a homeschooling mom, curriculum writer, and former classroom teacher. I recently had the pleasure of helping Mary Bryant Shrader create The Modern Pioneer Cookbook Curriculum, which includes extensive lesson plans for grades K-12 to complement Mary’s bestselling book, The Modern Pioneer Cookbook.
- Get The Modern Pioneer Cookbook Curriculum (Free and over 250 pages!)
- Get The Modern Pioneer Cookbook
- Read The Modern Pioneer Cookbook Curriculum Lesson Experience Article Series
Now, I’m excited to embark on a journey of experiencing these lessons with my own children, ages 6 and 8 (and sometimes my 3-year-old, too). I’ll be facilitating a total of 14 lessons, one for each chapter in The Modern Pioneer Cookbook Curriculum. As we go through the curriculum, I’ll document our experience to share with all of you!
Getting Started with Superfoods
Chapter 9 of The Modern Pioneer Cookbook teaches us about traditional superfoods. The table below summarizes the recipes, principles, and learning objectives for each lesson.
| Grade Band | Recipe | Traditional Kitchen Principles | Learning Goals (Students will…) |
| K-4 | Deep-Fried Beef Liver Nuggets with Fermented Ketchup | 1. Homemade food 2. Low-waste kitchens | ● Define superfood ● Discuss the role of superfoods in a homemade kitchen ● Prepare deep-fried nuggets from frozen beef liver, following a recipe |
| 5-8 | Roasted Bone Marrow | 3. Real, whole foods 4. Seasonal eating | ● Define nutrient and nutrient-dense ● List examples of nutrient-dense foods ● Prepare roasted bone marrow, following a recipe |
| 9-12 | Super Mineral Broth | 5. Maximizing nutritional value 6. Preservation for self-sufficiency | ● Compare and contrast nutrient-rich and nutrient-dense foods ● Discuss the role of nutrient-rich and nutrient-dense foods in a traditional foods kitchen that seeks to maximize nutrition ● Prepare mineral-rich broth from vegetables |
These three recipes are very different from one another:
- The K-4 recipe involves dredging and deep frying. If you’ve made fried chicken before, it’s basically the same process.
- The 5-8 recipe may be less familiar if you’ve never prepared bone marrow before, but it’s super simple. All you have to do is source the beef marrow bones and roast them in the oven for 15 minutes.
- The 9-12 recipe involves a lot of vegetable chopping, but once your broth starts simmering, the process is very passive.
Planning for Students of Different Ages
Students of different ages can work together on any of the Chapter 9 recipes.
- The K-4 activity may be too basic for older students, but it can be used as a starting point for discussing factory-processed foods in more detail.
- The 5-8 activity contains a nutrient-dense scavenger hunt and menu creation. Younger children may enjoy this but will likely need support.
- In the 9-12 activity, students compare and contrast nutrient-rich and nutrient-dense foods before making a meal plan. This activity is appropriate for many 5-8 students but will likely be too advanced for K-4 students.
As always, you’ll want to preview each lesson beforehand to plan for each unique student.
Discussion: Superfoods
Following the K-4 lesson plan, I started our discussion by asking my children if they’d ever heard the word superfood before. They said they had, so I asked them to define it. They replied, “A food that’s super healthy!” I had them copy the following definition in their kitchen journals:
- Superfood: A food that is especially healthy
Next, we talked about the idea that superfoods aren’t perfect, as some of them have antinutrients that can cause health problems. I reminded my kids about the traditional cooking techniques they’ve used so far, such as fermentation and sprouting, that help reduce the negative impact of antinutrients.
We shifted our focus to the two themes of the K-4 lessons: homemade food and minimal waste. We discussed how superfoods fit into the traditional foods kitchen. My children pointed out that it’s important to know “which foods are super,” as well as how to properly prepare superfoods for maximum nutrition. This knowledge allows us to make the healthiest food at home.
When we finished our discussion, I invited my children to draw pictures of themselves as “Superchefs” in their kitchen journals. I also created a coloring page and activity sheet centered on the idea of a “superchef.” If you have preschoolers, they will likely enjoy this as well. (My 3-year-old did!)

K-4 Activity: How Nuggets Are Made
To begin the activity segment of the lesson, I brought up the topic of nuggets, asking my children how they think nuggets are made. We talked about where most nuggets come from, such as fast food restaurants and the frozen section of the grocery store. I asked my kids to use their imaginations to describe what a food factory might look like. To encourage visualization, I created a printable worksheet where kids can draw a “nugget factory” from their imagination.
- Download the Nugget Factory Activity (K-4) (PDF file)
I told my children that we’d be making our own homemade nuggets, but instead of using processed chicken, we’d be using fresh beef liver. On the computer, we watched the “How to Cook Beef Liver (Your Kids Will Love!)” video that shows Mary making liver nuggets from scratch. I wanted my kids to have a good idea of what to expect. They enjoyed watching Mary cook and were excited about getting their own turn to make the nuggets.
After watching the video, I asked my children to summarize the process of making the nuggets. They gave detailed descriptions, so I encouraged them to simplify the recipe into four steps. Once we agreed on what the four main steps of the recipe are, they wrote these down in their kitchen journals:
- Cut the liver into small pieces
- Soak the liver pieces in buttermilk
- Roll the liver pieces in flour
- Fry the liver pieces in beef tallow
Now we were ready for our recipe!

5-8 Activity: Scavenger Hunt and Menu Planning
The middle and high school lessons explore the subject of superfoods in more depth. Middle schoolers explicitly learn that nutrients are substances in food that help us grow and stay healthy and that nutrient-dense foods are high in calories and rich in vitamins and minerals. This information is then discussed in the context of the two overarching themes of the 5-8 lessons: whole foods and seasonal eating.
For their activity, middle school students embark on a scavenger hunt to find nutrient-dense foods in The Modern Pioneer Kitchen and maybe in their own kitchens, too.
Then, they create their own menus using dishes from The Modern Pioneer Kitchen. They have two options for their menus:
- Create a full menu for an imaginary restaurant. Consider sections like “Appetizers,” “Lunch,” “Dinner,” and “Dessert.” Include as many nutrient-dense meals as you can. Be sure to describe each dish for your customers.
- Create a family menu for a memorable holiday or celebration day. Start with breakfast and include lunch, dinner, dessert, drinks, and snacks. What will you serve?
They can document the menu they choose to make with the Nutrient-Dense Menu worksheet.
- Download the Superfoods Menu Worksheet (5-8) (PDF file)
9-12 Activity: Nutrient-Dense and Nutrient Rich
High school students go a bit further and compare and contrast nutrient-dense and nutrient-rich foods:
- Nutrient-dense: High in calories and rich in vitamins and minerals
- Nutrient-rich: High in vitamins and minerals but low in calories
The definitions provide a helpful distinction even for adults, who may not realize the difference between these two terms. High schoolers complete a Venn diagram and list examples of nutrient-dense and nutrient-rich foods.
Like the other two grade bands, high schoolers connect the topic of superfoods to the principles that guide their curriculum: maximizing nutritional value and preserving food for self-sufficiency. To conclude the discussion, students make a meal plan and shopping list to encourage them to include nutrient-dense and nutrient-rich foods in their diet.
- Download the High Nutrient Meal Plan (9-12) (PDF file)
Recipe: Beef Liver Nuggets

Supplies
The first thing we did to get ready for our recipe was gather our supplies. We took out:
- Dutch oven (Alternatively, use a cast iron skillet, but note you may experience more splattering out of the pan.)
- Candy thermometer (Alternatively, use a deep-frying thermometer or follow Mary’s temperature guidelines in the video.)
- Spider strainer (Alternatively, use a slotted spoon.)
- Sharp serrated knife (When it comes to knives, you can use a sharp steak, bread, or chef’s knife.)
- Two bowls (Use one large and one medium bowl.)
- Large baking sheet (You may need two sheets.)
- Parchment paper
- Large cooling rack (Alternatively, use paper towels.)
- Large spoon
- Splatter screen
While the splatter screen isn’t necessary, I find it very helpful when deep frying with kids. My son liked holding it in front of him like a shield while we added the nuggets to the tallow. Overall, it prevented my children from getting hit with hot drips of fat!
Ingredients
The ingredients needed for this recipe are:
- Frozen beef liver (I ordered the liver from US Wellness Meats, using Mary’s link and promo code (MARYNEST) for a 15% discount. There are other companies with discount codes you can order from too.)
- Buttermilk (Alternatively, you can use regular whole milk)
- All-purpose flour
- Sea salt
- Black pepper
- Beef tallow (If you made the 5-8 recipe for Chapter 3, you probably still have some homemade beef tallow. If not, you can purchase it from US Wellness Meats or your local butcher or grocery store.)
- Fermented ketchup
If you prepared the K-4 recipe from Chapter 8 of the Modern Pioneer Cookbook Curriculum Experience, you will use your homemade fermented ketchup. If not, consider making the ketchup before you start on the liver nuggets.
Note: The fermented ketchup recipe requires some brine from a previous ferment. We used brine from the pickles we made for recipe from Chapter 5 of the Modern Pioneer Cookbook Curriculum Experience. If you’re starting from scratch, you’ll need to make a fermented vegetable first and then the ketchup.

Recipe Steps
You will need to partially thaw the frozen beef liver to cut it easily. I was nervous about this part, but it was easier than I expected. I used a sharp steak knife to cut the liver into chunks. I could see that it would be much more difficult to cut if it were completely thawed.
Once I cut the liver, my children measured the buttermilk and added it to the large bowl. Then, we added the liver pieces and let them soak for an hour. Soaking the liver in the buttermilk (or regular milk) improves the texture and the taste of the liver, making it ideal for first-time liver-eaters!
As the liver soaked, we measured and combined the flour, salt, and pepper in a medium-sized bowl. (You can also use a plate). After the hour was up, we were ready to dredge the liver chunks through our mixture!
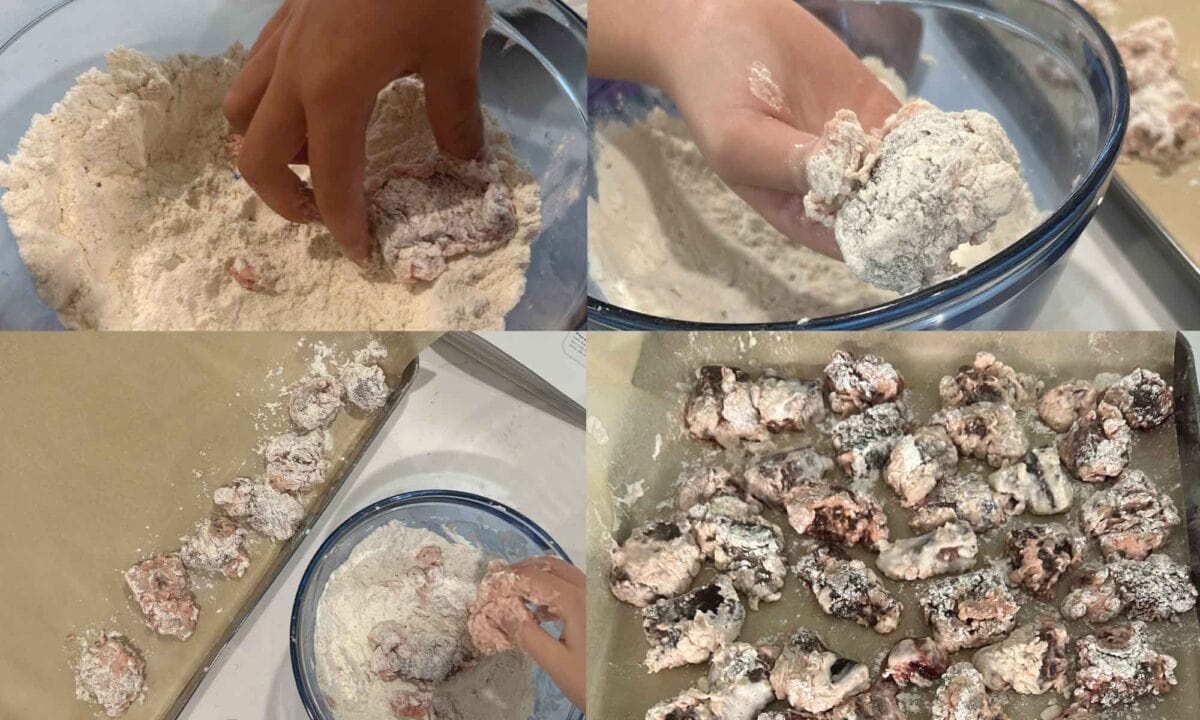
Dredging the Beef Liver Chunks
My kids had never seen beef liver before, and at first, they were hesitant to touch it. I assured them it would be fun, and once they got started, they agreed. They took turns rolling the wet liver chunks in the flour mixture, dipping them back in the buttermilk, and rolling in the flour again. We placed the dredged pieces on a baking sheet lined with parchment paper and let them sit for a few minutes.
Next, we prepared our beef tallow. Using a candy thermometer to monitor the temperature, we melted the tallow in the Dutch oven until it reached 375°F (191°C). Then we started adding the liver pieces, being careful not to overcrowd the pot. We fried the nuggets until they were golden brown and looked delicious!

Tasting: Liver Nuggets
As we added the golden-brown nuggets to the cooling rack, my children got increasingly excited to taste them. When they were all done, we sprinkled some extra salt on top and served them with our homemade fermented ketchup. Both kids loved them! I was honestly surprised that my 3-year-old didn’t gobble them up, too, but he’s been extra picky lately.
As I mentioned, none of my children had tasted liver before. When I asked them to describe the nuggets, they both agreed that they were “different, but good!” I wouldn’t go so far as to say that liver nuggets are their new favorite food, but I was happy that they ate them all! The soaking, breading, and serving with ketchup definitely helped make the liver more kid-friendly.
If you’re looking for a way to get children (or adults!) to eat beef liver, this is a foolproof way to introduce the nutrient-dense food.
Where To Buy Beef Liver
Are you looking for grass-fed beef liver to make the Fried Beef Liver Superfood? Here are product links and discount codes for the companies that Mary trusts and shops from:
- Northstar Bison (Save 10% off orders with this link and discount code MARYSNEST)
- Shirttail Creek Farm (Save $10 off orders $100 or over with this link and discount code MARYNEST)
- US Wellness Meats (Use the discount code MARYNEST and this link to save one-time 15% off regular-priced items on your order)
Discover more companies and products for your traditional foods kitchen with Mary’s Shopping Guide.
Final Thoughts
Using my experience facilitating this lesson, here are my ultimate takeaways for anyone getting ready for Chapter 9:
- To make your own beef tallow for frying your nuggets, follow the 5-8 recipe from Chapter 3.
- To make your own probiotic ketchup, follow the K-4 recipe from Chapter 8. (Note: You will need brine from a successful ferment; see the Chapter 5 recipes.)
- If your students are making liver nuggets, be sure to give them a large, clear workspace. They’re likely to make a bit of a mess as they handle the raw liver and dredge in the buttermilk and flour.
- Generally, it will take longer for children to dredge their liver chunks than adults. Allow for some flexibility when planning and scheduling the lesson.
- Because children may also be messier and less efficient when dredging the liver, it’s a good idea to have extra buttermilk and flour on hand. I found that I needed more of both!
- For deep frying, consider adding a splatter screen to your list of supplies.
- Finally, I suggest watching Mary’s videos with your students before getting started!
Order YOUR COPY Now!
The Modern Pioneer Pantry
Simple ingredients, timeless techniques, and a well-stocked pantry. Discover over 100 nourishing recipes to preserve food and turn pantry staples into delicious, homemade meals. Build a wholesome, traditional pantry—just like a modern pioneer!