Making a Sourdough Starter is easier than you think. The secret is to start with rye flour. You can use freshly ground rye grain for best results. Or, if rye grain isn’t available to you, use rye flour, but make sure it’s fresh and not passed its expiration date.

Watch the How to Make a Foolproof Sourdough Starter video
Affiliates note: As an Amazon Associate I earn from qualifying purchases. My content may contain affiliate links to products and services. If you click through and make a purchase, I’ll receive a small commission. It does not affect the price you pay.
Table of Contents
- What is a Sourdough Starter?
- Ingredients
- How to Make Sourdough Starter
- How to Store and Use Your Starter
- How to Use Sourdough Discard
- Recipe Tips
- Frequently Asked Questions
- Grind Your Own Flour with the Mockmill
- The Modern Pioneer Pantry
- Download Your Free 36-Page Pantry List
- Join the Traditional Foods Kitchen Academy
- More Kitchen Pioneer Videos
- How to Make a Foolproof Sourdough Starter Recipe
- Shop for My Favorite Items
Making your own sourdough started isn’t complicated but if you’re having some difficulties, be sure check out my sourdough starter troubleshooting tips for help!
What is a Sourdough Starter?
A sourdough starter is a combination of flour and water that undergoes a fermentation process when left at room temperature.
This fermentation turns the flour and water mixture into a “natural” leavening agent (as opposed to store-bought packaged yeast) that uses naturally occurring yeasts and good bacteria to help bread and other baked goods rise.
Ingredients
Find the full printable recipe with measurements below.
For this specific recipe, I recommend the following ingredients:
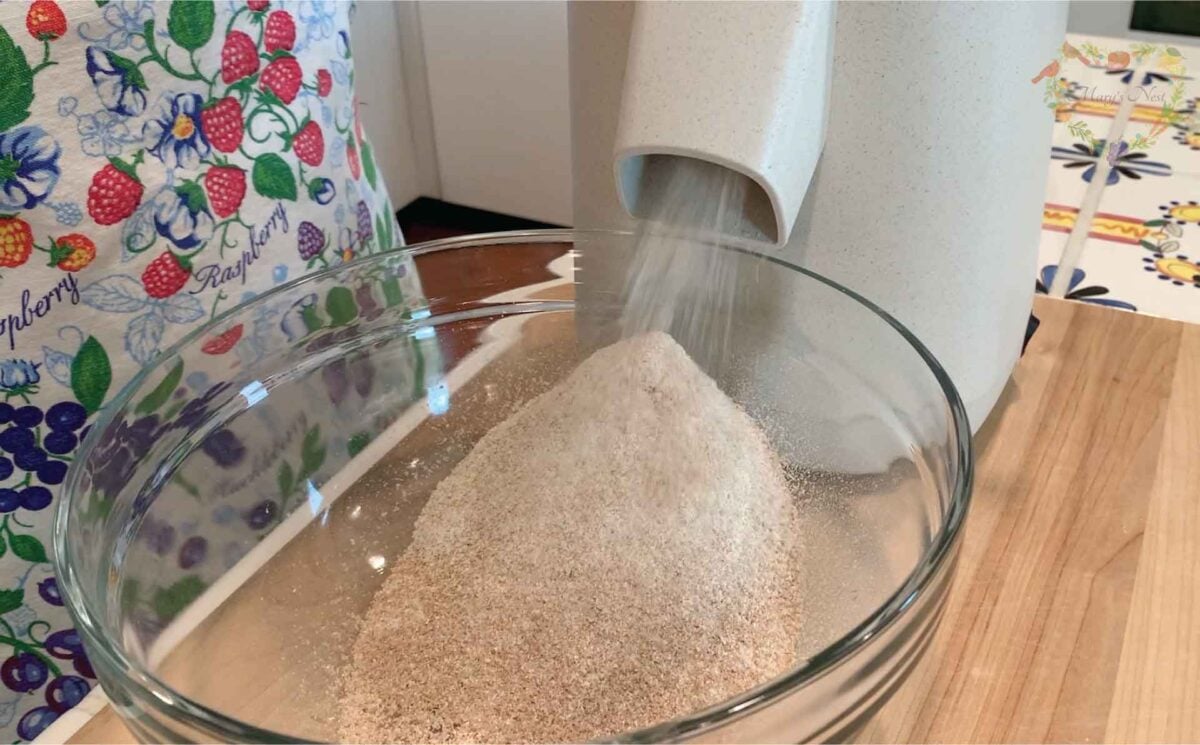
- Rye flour: The secret to a successful sourdough starter is to start with rye flour, preferably freshly milled for the best results. If you don’t have access to rye grain you can use rye flour but make sure it’s fresh and not passed its expiration date.
- Filtered water: For best results use chlorine-free filtered water.
How to Make Sourdough Starter
The process of making sourdough starter isn’t hard but it does take place over several days.
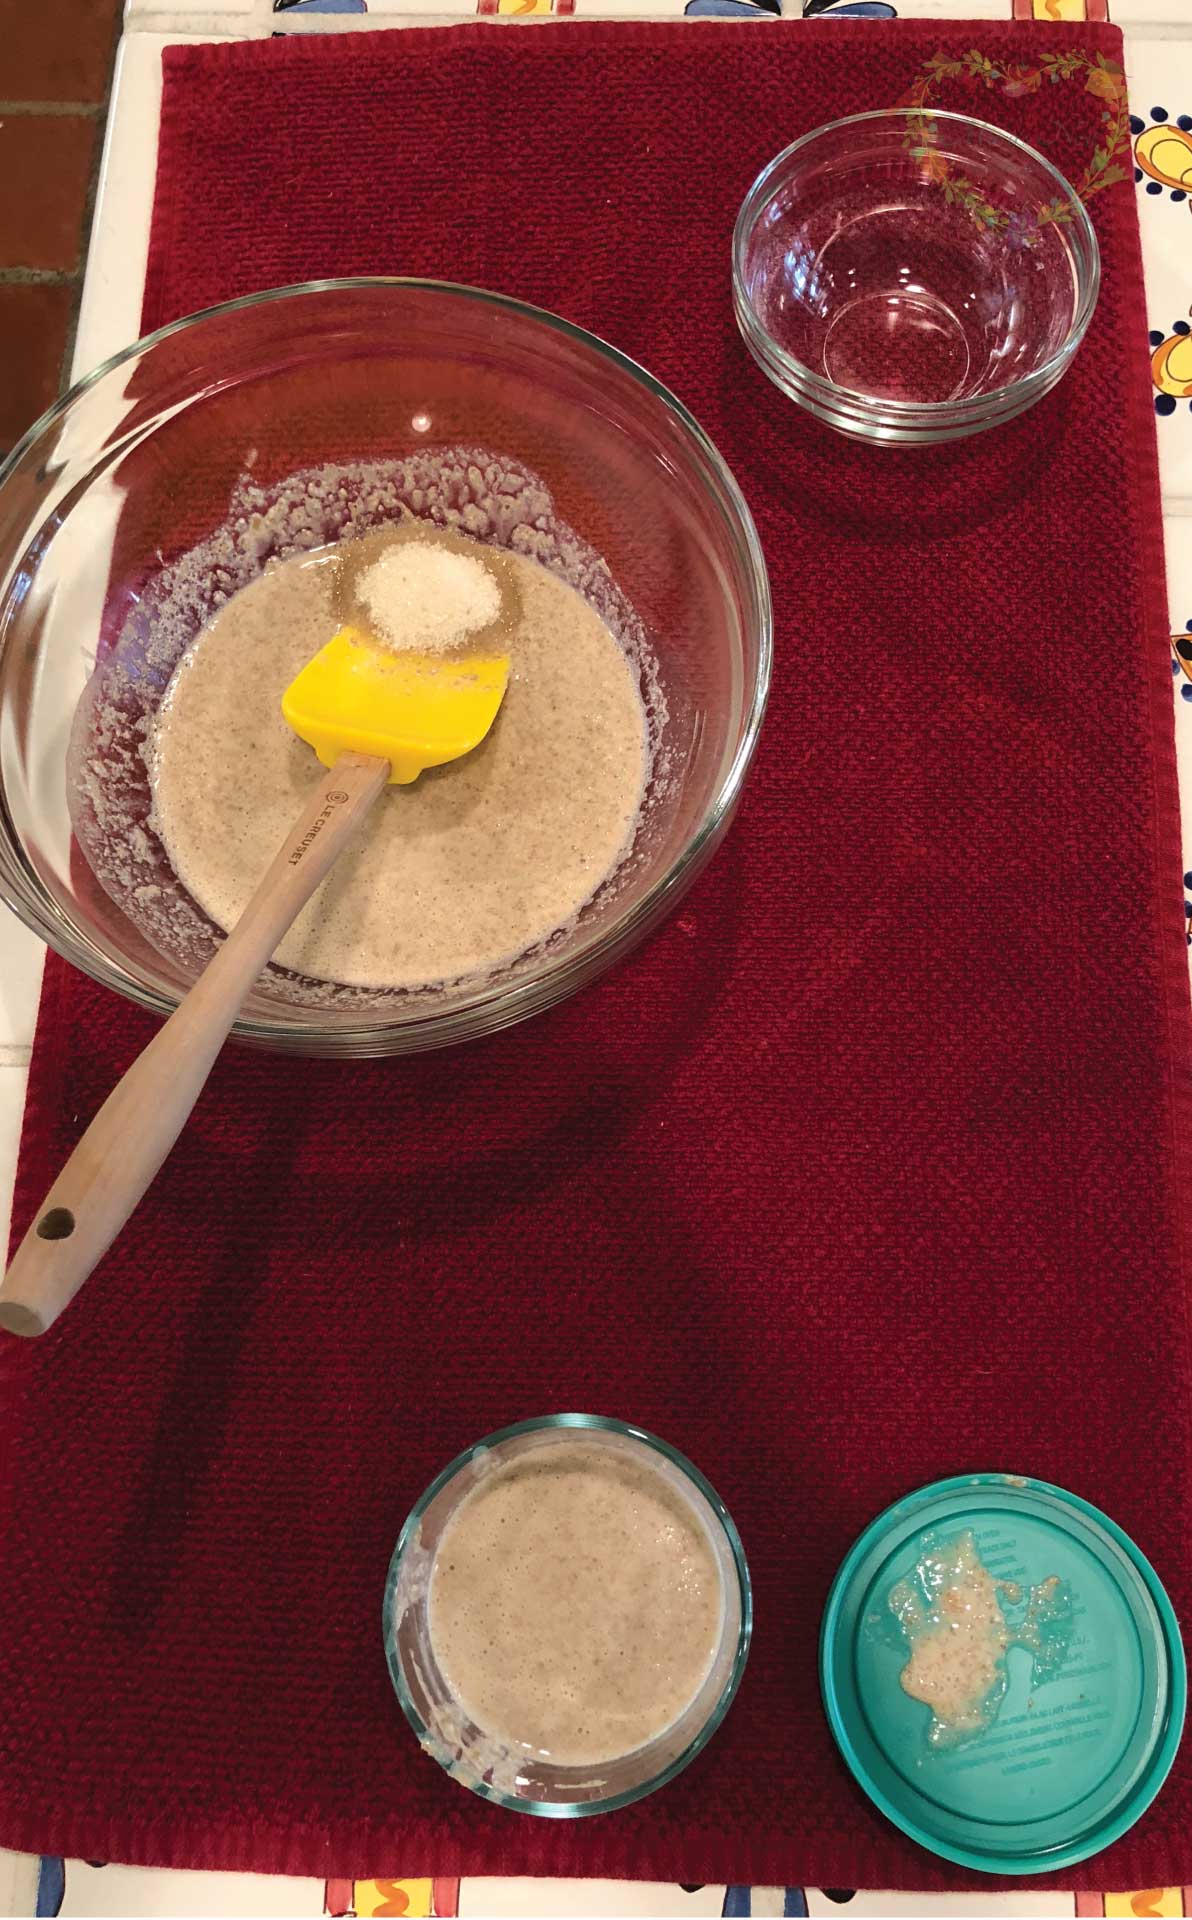
Step 1 – On Day 1, Combine one tablespoon of rye flour with two tablespoons of room temperature or lukewarm water (preferably filtered chlorine-free water) in a small jar or bowl that holds about one cup. Mix well incorporating lots of air. Cover the jar or bowl loosely and place in a warm spot in your kitchen at about 75°F (24°C) where it can rest undisturbed.
PRO TIP: On Day 2, you don’t need to do anything. But you may notice the starter mixture beginning to smell a little sweet—some say like honey. But if it doesn’t, don’t worry it doesn’t mean there is anything wrong.
Step 2 – On Day 3, stir in one tablespoon of rye flour (but no water) into your mixture. Give it a good stir being sure to incorporate a lot of air. Place the cover back on and put it back in its resting spot.
Step 3 – On Day 4, add two tablespoons of room temp or lukewarm water and two tablespoons of rye flour into your mixture and stir well incorporating a lot of air. After mixing put the cover back in place and return it to the same spot to rest.
Step 4 – Check your starter again on Day 4 8 hours or up to 12 hours after adding in the water and rye flour. It should be bubbly and foamy.
Step 5 – If everything has gone well you’ve got a bubbly and foamy starter that’s thriving and ready to make into sourdough bread.
What Do I Do If My Starter Hasn’t Bubbled on Day #4?
If it has not bubbled up yet and there is no foam, leave the mixture to sit for another 12 hours. Then repeat Day 4, which is now Day 5 for you.
Check it halfway through after 12 hours on Day 5. At this point, it should be ready. If not, rye grain/rye flour was probably very old. The key to success here is to have fresh rye flour.
How to Store and Use Your Starter
Once you get your starter going, you’re ready to make a sponge and get started baking sourdough bread. You can also make a sourdough pizza crust and no-knead sourdough bread.
When it comes to storing the starter, you have three different options.
- Leave it at room temperature
- Refrigerate it
- Dehydrate it
Store Your Starter at Room Temperature
You should feed the remaining starter should with equal parts water and flour. If you leave your starter on the counter at room temperature, you should feed it every day at 12-hour intervals.
If you are not going to use your starter every day to bake bread, but you want to leave it at room temperature, you will need to remove half of the starter from the jar.
What you remove is called the “discard.” But do not discard it! Place it into a separate container in the refrigerator or freezer. When you have enough you can use it in baking recipes.
How to Store Starter in the Refrigerator
If you prefer to refrigerate your starter because you bake less frequently, you will want to still feed it, but you will only need to feed it once per week.
Remove it from the refrigerator, remove half of the starter, and add it to your discard. Then feed the starter with equal parts water and flour. Leave the fed starter on the counter at room temperature for about an hour, then re-refrigerate it.
Dehydrating Sourdough Starter
If you dehydrate your starter, you will need to rehydrate it before baking with it which you can learn about in this video on How to Dehydrate Sourdough Starter. Towards the end of the video there is info about how to hydrate it.
How to Use Sourdough Discard
Whether you store it at room temperature or in the refrigerator, every time you feed your starter, you will remove some of it called the discard.
When you have collected a few cups of discard you can use it to make various sourdough discard recipes, including homemade pancakes, waffles, sourdough crackers, casserole toppings such as in this sourdough skillet dinner, and more. It also makes a tasty homemade flatbread with starter discard.
Recipe Tips
- Don’t like the flavor of rye? While it’s necessary to make the starter, it’s ok to use any flour you want to use to make bread. This way you will not have any rye taste in your final product.
- You know your starter is ready when it’s bubbly and a foam forms on top of the flour and water mixture.
- Be sure to start your starter with freshly milled rye flour. This is essential to creating a good sourdough starter.
- If you do not have the option to mill you own, be sure to use milled rye flour purchased from a reputable source so that you know it is fresh. Hodgson Mills and Bob’s Red Mill are usually reliable sources unless you have a local option.
Frequently Asked Questions
Yes, you do. Generally, a sourdough starter is fed with equal amounts of flour and water to keep it growing. For example, if after removing the discard, you have a 1/2 cup of starter in a jar, you will want to feed it with a 1/2 cup of flour and a 1/2 cup of water. Stir well.
This will provide you with 1 1/2 cups of starter. You can use 1 cup of starter to make bread and still have a 1/2 cup of starter left which will help keep your starter alive and well when you feed it.
How frequently you need to feed it depends on whether you store it in the fridge or at room temperature.
If you find that on Day 5 your starter isn’t bubbling, it’s likely that your flour was quite old. Unfortunately you will need to start over using fresh rye flour.
Grind Your Own Flour with the Mockmill
When it comes to electric grain mills, after I did A LOT of research, I decided to buy a Mockmill. And am I so happy I did! The Mockmill is a very affordable but beautifully crafted German-made mill that stone grinds grain with settings ranging from 1 to 10—fine to coarse ground grain.
Learn more about Mockmill electric grain mills for making fresh flour and their Flake Lover’s Flaker that flakes whole grain in minutes. (This is not a sponsored post, I bought the Mockmill products that I show you, and I’m a happy user of their devices in my kitchen.)
- Mockmill 100 Grain Mill unboxing
- Get the Mockmill 100 Stone Grain Mill (Same product I show you in my unboxing video.)
- Flake Lover’s Flaker from Mockmill in action (Using this device, you can flake whole grain in minutes.)

Order YOUR COPY Now!
The Modern Pioneer Pantry
Simple ingredients, timeless techniques, and a well-stocked pantry. Discover over 100 nourishing recipes to preserve food and turn pantry staples into delicious, homemade meals. Build a wholesome, traditional pantry—just like a modern pioneer!
Download Your Free 36-Page Pantry List
For an extensive list of the traditional foods you can make and purchase to stock your pantry, be sure to download my free 36-page Traditional Foods Pantry List. This comprehensive eBook is full of links to recipe videos, helpful articles, and more!

And if you’re looking for a printed book full of my traditional foods recipes to show you how to create a traditional foods kitchen, be sure to order your copy of my bestselling book, The Modern Pioneer Cookbook.

Order YOUR COPY Now!
The Modern Pioneer Cookbook
Seasonal ingredients, traditional techniques, and nourishing recipes. Over 85 traditional, from-scratch recipes! Discover for yourself how you can use simple ingredients and traditional techniques to cook the modern pioneer way.
Join the Traditional Foods Kitchen Academy
Are you looking for more traditional foods videos? If so, I invite you to join the Traditional Foods Kitchen Academy. Members of this optional paid YouTube community get access to exclusive videos and other members-only perks. Plus, your YouTube comments include a special members-only badge.
More Kitchen Pioneer Videos
Baking with Whole Grains: The Maslin Method, Grain Mills, and America’s Bread Basket
Explore whole grain baking with The Maslin Method, fresh-milled flour, grain mills, heritage wheats, and more.
A Sweet Season of Celebration and New Beginnings with The Maslin Method Baking School Series
Celebrate the close of a heartfelt book tour and the exciting launch of The Maslin Method Baking School for traditional baking.
Why We Should Incorporate Mackerel Into Our Diet
Easy and nourishing ways to enjoy mackerel into your meals.
Stay in Touch with Mary’s Nest
- Subscribe to My YouTube Channel for Traditional Foods Videos (Free) - When you subscribe, be sure to click on the notification bell that will let you know each time I upload a new video.
- Subscribe to Mary’s Traditional Foods Newsletter (Free) - Get a free 36-page eBook for signing up: How to Stock Your Essential Traditional Foods Four-Corners Pantry.
- Join the Traditional Foods Kitchen Academy - For more detailed videos and exclusive members-only perks, join my YouTube membership community.
- Order The Modern Pioneer Cookbook - Get a hardcover book of Mary's nourishing recipes from a Traditional Foods Kitchen. This bestselling cookbook is published by Penguin Random House with their DK imprint.
- Order The Modern Pioneer Pantry - Get Mary's latest hardcover cookbook about preserving food and making delicious meals from your Four Corners Pantry. Mary's second cookbook is also published by Penguin Random House.
I look forward to having you join me in my Texas Hill Country Kitchen!
I’d like to receive more tips and recipes from Mary’s Nest.
How to Make a Foolproof Sourdough Starter
Ingredients
- 5 tbsp Rye flour preferably freshly milled
- 4 tbsp Filtered water preferably filtered, chlorine-free
Instructions
- Day 1: Mix 1 tbsp rye flour and 2 tbsp room temp/lukewarm water (preferably filtered chlorine-free water) in a small jar or bowl that holds approximately no more than 1 cup. Mix the two ingredients well, incorporating lots of air. Cover the jar or bowl loosely. Place in a warm spot in your kitchen at about 75°F (24°C) where it can rest undisturbed.
- Day 2: Do nothing. The starter in the making will probably smell a little sweet—some say like honey. But if not, don’t worry.
- Day 3: Now stir in 1 tbsp rye flour (no water) into your mixture and stir well, incorporating a lot of air. You may see a few bubbles starting but if not, don’t worry. Re-cover loosely and re-place in its undisturbed warm spot.
- Day 4: Add 2 tbsp room temp/lukewarm water and 2 tbsp rye flour into your mixture and stir well, incorporating a lot of air. Re-cover loosely and re-place it back in its undisturbed warm spot.
- Day 4 1/2: After 8 hours or up to 12 hours later check on your starter. It should be bubbly and foamy. If not, don’t worry. If it has not bubbled up and there is no foam, leave it for another 12 hours. Then repeat Day 4—which is now Day 5 for you. Check it halfway through after 12 hours on Day 5. At this point, it should be ready. If not, rye grain/rye flour was probably very old. The key to success here is to have fresh rye flour.
- If everything has gone well, and you have a thriving starter, you are now ready to make sourdough bread. Using your rye starter, you will first want to make a "sponge" which you will use to make your sourdough bread. I have included this information in the Recipe Notes below along with a recipe for a No-Knead Sourdough Bread.
Video
Notes
Shop for My Favorite Items
- Pyrex Simply Store Glass Rectangular and Round Food Container Set
- Pyrex 4-Cup Measuring Cup
- All-Clad Stainless Steel Measuring Spoons
- 2-Cup Prep Bowl with Lid
- Bob’s Red Mill Organic Whole Grain Rye Berries, 25 Pounds
- Food to Live’s Organic Rye Berries by Food to Live, 3 Pound Bag
- Bob’s Red Mill Organic Dark Rye Flour – 22 oz – 2 pk
- Hodgson Mill Stone Ground Whole Grain Rye Flour – 5 lb. Bag (Pack of 6)
- Arrowhead Mills Organic Rye Flour, 20 oz. Bag (Pack of 6)
- Wine Colored Cotton Terry Dish Towels
Amazon Shop and Shopping Guide
- Visit Mary’s Nest Amazon Shop
- Get a 30-day Audible trial with a free audiobook
- Visit my Shopping Guide page
Get up to 15% off for stocking your Traditional Foods Pantry and equipping your Modern Pioneer Kitchen, including discounts from US Wellness Meats, Farmhouse Teas, Backwoods Home, Masontops, Cultures for Health, Survival Garden Seeds, Redmond Real Salt, and More!

Hello! Thank you for your tutorial and recipe. I’m ready to give sourdough a try! I’m curious, once it comes time to bake the bread, is it possible to substitute sprouted spelt flour for the bread flour? Would the ratio of 4 1/2 cups of flour need to be altered if that’s the case? Thanks so much 🙂
Hi Steph,
Great question! You can use the same amount of flour. However, whole-grain flour, like spelt, often requires a little bit more water or other liquid that you’re using. So you may need up to an additional 1/4 of a cup.
When you are making the bread, look at my video where I show you the type of texture you’re looking for, and you will know whether you need a little extra water or not. Also, since you are using whole grains, which can make a bit denser bread, you can always add a little barley malt if you have it on hand. It helps with the rise. It’s basically sprouted barley!
So if you have barley, you can sprout, dry, and grind it to make your own barley malt! When I learned that, I found it fascinating.
In any event, sprouted whole grain flour does, to a certain extent, create a little bit of a lighter loaf than if the grain has not been sprouted, so I think your bread is going to come out quite nicely. I’m so happy that you’re on this traditional foods journey with me!
Love and God Bless,
Mary
Love your videos I am new to making breads and really want to give it a try but I am bit afraid to but in watching you make the bread I really want to give it a try
Hi Vivian, Oh yes, please give it a try – you can do this!! Love, Mary
Hi Mary, I am new to sourdough and was becoming overwhelmed by all the videos I was watching. That is, until I found yours!! You explain everything so well. Thanks for not getting too technical.
I want to begin making a starter but there is no rye flour to be found in any of the 5 stores or online that I have checked. I was lucky enough to get a 5 lb bag of whole wheat flour, the last on the shelf, and 1 5 lb bread flour that was only 1 of just a few left on the shelf. My question is, can I substitute the rye flour with wheat flour? Will I get the same results or should I wait until I can get rye flour to start my sourdough baking journey?
Thanks so much for all of your videos.
Hi Elaine, Thank you so much for writing to me! And I am so happy to hear that I was able to make the sourdough process clear to you. Yes, you can definitely use whole wheat flour to get your starter going. It may just take a day or two extra to start bubbling. And don’t lose hope as you go through this process. Sourdough starter can be very persnickety in the beginning! LOL!!
Do you enjoy learning about making other traditional foods? If so, I have a playlist of some of my videos titled “Mastering the Basics of Traditional Nutrient Dense Foods Cooking”. It’s a series of 15 detailed videos that covers How to Make Bone Broth, Cultured Dairy, Ferments, Sourdough Starter (my foolproof stater that your working on now), Sourdough Bread, Soaked and Sprouted Nuts and Beans, and How to Soak and Sprout Grains to Make your own Sprouted Flour at Home. You can watch it here: https://www.youtube.com/playlist?list=PLkRuW3pBo2U3b4eu0QraZReKlGzA11h3y And please share the playlist with any other folks you think might be interested in learning about these types of things. I’m passionate about the book Nourishing Traditions by Sally Fallon (of the Weston A Price Foundation) and want to help as many people as I can learn how to make Traditional “Nutrient Dense” Foods.
And for more details on some of these subjects mentioned above…(and more), be sure to check out these detailed playlists:
➡️How to Make Bone Broth: https://www.youtube.com/playlist?list=PLkRuW3pBo2U0JFsTi2N7sHSpU-vBR04CH
➡️How to Make Fermented Vegetables: https://www.youtube.com/playlist?list=PLkRuW3pBo2U2EhVspEV5d4Xs2s4pcbHbr
➡️How to Make Fermented Condiments: https://www.youtube.com/playlist?list=PLkRuW3pBo2U0hCKYoMMBeVD-9bA6TckEj
➡️The Complete Guide to Sourdough (You might find this helpful too): https://www.youtube.com/playlist?list=PLkRuW3pBo2U3NKN0GHvGCpiWNxcTefLof
➡️The Complete NO KNEAD BREAD Playlist: https://www.youtube.com/playlist?list=PLkRuW3pBo2U0ZnA45FadK99NvKZLKh-6N
➡️How to Make Bread with or without Yeast Playlist: https://www.youtube.com/playlist?list=PLkRuW3pBo2U344nspo8zPj3O3LfyNVHZS
➡️And if you are interested in learning about how to make various types of Homemade Dairy including Cultured Butter, Cottage Cheese, Sour Cream, Ricotta Cheese, and more, be sure check out this playlist: https://www.youtube.com/playlist?list=PLkRuW3pBo2U2R7u0Ri26HwdLMjUa4iJJX

➡️Also…If you enjoy making homemade pantry type items, you might enjoy my playlist: https://www.youtube.com/playlist?list=PLkRuW3pBo2U1MqC3YAw7ZRYjuL9FBGSwc where I show how to make Apple Cider Vinegar (see more info about this below), 10 Flavored Extracts including Vanilla Extract, 10 Seasoning Blends including Ranch Dressing Mix and Onion Soup Mix, 1- Minute Homemade Mayonnaise, Homemade Bouillon – and how to dehydrate it, Natural Food Colorings, Evaporated Milk, Condensed Milk, Preserved Citrus, Breadcrumbs, Croutons, and more!
And if you like the idea of making your own Apple Cider Vinegar as mentioned above…Be sure to check out the Apple Cider Vinegar Playlist: https://www.youtube.com/playlist?list=PLkRuW3pBo2U1QPA95O2-oOvxwtO-v3L4L which a 3-part series where I walk you through the entire 30-day process. And if you like making vinegar, I also have a Homemade Citrus Vinegar Playlist: https://www.youtube.com/playlist?list=PLkRuW3pBo2U3apQRTzhfQBkR_x0rb514U And I have one more vinegar video where I show how to make vinegar from Strawberry Scraps. You can watch it here: https://www.youtube.com/playlist?list=PLkRuW3pBo2U2M3dRA483q5KJ7JkJfn3fS
➡️And…Have you seen my playlist for making immune boosting foods and natural remedies including a Super Mineral Detox Broth? You can look through the playlist here: https://www.youtube.com/playlist?list=PLkRuW3pBo2U0p9nRAWldbyqYSbgwzARGd You may like some of these recipes.
➡️And if you are interested in how to make probiotic rich fermented drinks, here is my playlist of some fun drinks including How to Make Homemade Sodas, Mocktails, Drinking Vinegar, Homemade Energy Drinks, Switchel, Shrubs, and More: https://www.youtube.com/playlist?list=PLkRuW3pBo2U2w2-CiBrkNnZj_IIlqZc9h You may enjoy these videos. And if you are interested in learning how to make Kombucha and/or Water Kefir, I have a playlist which includes a Beginners Guide to Kombucha Making along with a video on making water kefir for beginners…which you can watch here: https://www.youtube.com/playlist?list=PLkRuW3pBo2U3YysV0OYOMsxsJuf_sxPTK
➡️And in the Modern Pioneering spirit…If you enjoy canning, or are interested in learning about canning, I have a playlist of my canning videos here which include step-by-step tutorials: https://www.youtube.com/playlist?list=PLkRuW3pBo2U3HJRCmwVAvBNS90WjifR1U
➡️Oh…And here is my 2020 Channel Update for everything I have planned for this year: https://youtu.be/qjOJh8Cb_-k
Please let me know if you have any questions. I’m so happy to help! And also, let me know what other types of traditional food videos you would like to see me make. I’m SO glad you’re here!! Love and God Bless, Mary
PS – Are you in our FB group? It’s called Mary’s Nest Modern Pioneers. The direct link can be found in the description under this video. Come join us! We have a lot of fun chatting about Traditional “Nutrient Dense Foods and it’s a great place to get questions answered: https://www.facebook.com/groups/171869080205145/
Hi Mary,
I love your videos. I have done your Foolproof sourdough starter and it look ok. I have done the sponge and it double in size and look foamy. But I have done 3 batch of bread in the last two weeks and each time the bread dough is too sticky after rising double size. When I do the two finger test, my fingers are full of sticky dough. I have seen in your video if that happens we can keep the dough for pizza…but I don’t want to do that much pizza! I watch your video again and realize we might need to add some flour when preparing the bread dough. But unfortunately, we don’t have a close look to the dough when you are done mixing it and it is ready to be covered to rest for 6 to 10 hours till it double in size.
Can you please try to explain me how much sticky or not sticky my dough should be before I cover it to rest? IYou have to know I am used to do home made bread (by hand not in a bread machine) using dry yeast and knead my dough. You tell us this no knead bread dough is sticky…but apparently mine is too stiky since I lost my first 3 batches.
Thanks for your help
Oh dear! So sorry you lost your first three batches! I should do a follow-up video with more close-ups now that my filming skills have improved! But in terms of helping you now – I would continue to add some flour until the dough no longer sticks to your fingers. Keep me posted. Love, Mary
Hy Mary, it is me again. I have a more precise question regarding my problem described in my yesterday comment.
I look again at your video carefully and realise you mention we can add flour if necessary when preparing the bread.
In you video when you show us how to make your Foolproof Sourdough Starter, you show us close image of what it should look like at each stage. But in the video where you make the bread, we don’t have a close look at what the dough consistency should look. So the only thing I am not sure now is what the dough should look like…how much sticky, how much non sticky. Can you try to describe that for me because I realise this is my problem and I don’t know how much flour to add, till what consistency.
Thank you for your help
I understand completely. I really do need to make another video with more close-ups. I’ll do that this fall when I am baking more. In the meantime – just try to add more flour so that the dough is not sticking to your fingers. Love, Mary
Hey Mary,
I’m on Day 4. Started it on Monday today is Thursday. It hasn’t risen at all. Is this normal? Smells sweet/sour, has some bubbles, no foam, and no rising…I think it’s broken.
Hi Mel, sourdough starters can be very persnickety. Don’t give up. Try feeding your starter three times a day instead of two times a day and see if that makes a difference. Also, you can use something called “yeast water“ to feed your starter. Take some fresh fruit or dried fruit and fill a pint size jar a quarter of the way full. Then fill it halfway full with filtered water. Let this sit on your counter for a few days and then use that water… After straining out the fruit… To feed your starter along with your flour. Keep me posted. Love, Mary❤️🤗❤️
I made two sourdough starters from this recipe. One with a blend of wheat and rye, and one with rye only. I baked two breads with them, one was very tasty, and one not so much. Then I got busy so I put them in my fridge and forgot about them. I took them out the other day and it had been a month. The rye starter was nice and fuzzy, so it went down the bin (minus the jar, of course), the wheat/rye starter had a dark liquid on top, but I’d read somewhere that that was to be expected, so I added more flour and left it on the counter to see what would happen. I’ve never seen a starter that active! It smelled wonderfully, so last night I used it to create the sponge, and today I’ve made the dough. What I learned is that wheat can survive for a long time. I’ll be adding more wheat than rye to my starter from here on out. So far I’ve made the sourdough starter and the ginger bug. I’ve used the bug to successfully create gallons and gallons of “soda”. I’ve also moved on to making kombucha, wine and am in the process of my first jar of sourkraut. I’m going slowly and I’m having fun. 🙂
Hi Mary,
I saw you video on how to make starter with all purpose flour. It was so useful. I had bought organic bread flour and want to know if I can use this to make my starter or will I ve to get organic all purpose flour.
Hi Sabina, You can definitely use bread flour. Love, Mary
Hi Mary. Many years ago when I made sourdough bread I used a starter that I had made using a pinch or two of yeast and plain bread flour. I’ve never tried your way of making a “real” starter but I’m anxious to try. In fact I just ordered a cast iron pot to make sourdough bread using your method of baking. My rye flour has been in the freezer for quite a while since I rarely use it. Hope it’s still fresh enough to be viable. If not I’ll throw it out and buy fresh. I just hate to dispose of any type of flour that can still be good.
Hi Mary, Most of the recipes I’ve read say to discard half of the starter starting at day 2 and thereafter. Just wondering why you don’t. Thanks!!
Hi Shelly, Thanks so much for your comment. This is a great question! The reason people discard sourdough starter so as to avoid having too much starter. In this video, I am using very small amounts of starter, so there is no need for a discard. Hope this makes sense. BTW – if you are looking for ways to use discarded sourdough starter so that you don’t have to throw it out, I have share some recipes here: https://www.youtube.com/playlist?list=PLkRuW3pBo2U09KJ3fwoO4ud9jpyS9FhiJ Love, Mary
Hi Mary,
Just had a question about using the starter after refrigerated.
I finished feeding the starter today, but was not ready to make bread so I placed the starter in the fridge.
You mentioned that if you refrigerate the starter you need to feed it again before using it to bake bread.
To do so, I believe I should take the starter out of the fridge, mix 1 Tbsp. rye flour and 2 Tbsp. room temp/lukewarm water, mix well to incorporating lots of air, cover the bowl loosely, place in a warm spot and after 24 hrs it should be ready to make the sponge for the bread recipe.
Can you Let me know if I am understanding correctly?
Thanks a bundle,
Jen
Hi Jen,
Thanks so much for your comment. Yes, the procedure you outlined is correct. Did it work out OK?
BTW – Do you enjoy making other traditional foods? If so, I have a playlist of some of my videos titled “Mastering the Basics of Traditional Nutrient Dense Foods Cooking”. It’s a series of 15 detailed videos that covers How to Make Bone Broth, Cultured Dairy, Ferments, Sourdough Starter (my foolproof stater), Sourdough Bread, Soaked and Sprouted Nuts and Beans, and How to Soak and Sprout Grains to Make your own Sprouted Flour at Home. You can watch it here: https://www.youtube.com/playlist?list=PLkRuW3pBo2U3b4eu0QraZReKlGzA11h3y And please share the playlist with any other folks you think might be interested in learning about these types of things. I’m passionate about the book Nourishing Traditions by Sally Fallon (of the Weston A Price Foundation) and want to help as many people as I can learn how to make Traditional “Nutrient Dense” Foods who may not be able to afford the online programs that have a cost associated with them.
Please let me know if you have any questions. I’m so happy to help! And I’m SO glad you’re here!! Love, Mary PS – Are you in our FB group? It’s called Mary’s Nest Modern Pioneers. Come join us! We have a lot of fun chatting about Traditional “Nutrient Dense Foods and it’s a great place to get questions answered.
Hi Mary… Left my starter in the fridge n was wondering if I can just do the sponge dough straight out from the fridge instead of making step 1 again…
Hi Yuen, I think that might work. Give it a try and see how it turns out. Keep me posted. Love, Mary
Hello Mary,
Thanks for sharing your great receipe of your foolproof starter dough.
I am from the London in the U.K. I am on my day 1 of making my starter dough. And I have purchased the store brand of organic wholemeal rye flour. But after doing the 1 tablespoon of rye flour and the 2 tablespoon of Luke warm water mix, my mix is coming as a thick paste. This is contrary to the very runny mix I saw on your YouTube channel. Am I using the wrong sort of rye flour. I am just a bit worried that my day 3 rye flour add-on will be too thick.
Hi Ade,
Thank you so much for writing to me. Don’t worry. It will collect yeasts in the air wether it is thick or runny. However, you can always add a bit more water. Conditions in everyone’s kitchen varies as does weather in the area. So for the first two days if it is thick – don’t worry. However, by the third day you will want to add enough water so that it resembles what you see in the video. Hope this helps.
Love, Mary
Hi Mary, Your awesome, Keep doing what your doing!
I just wanted to let you know that the first time I tried to make your fool proof started it turned out perfect but I let it die. Then I thought I know everything about sourdough starters… After 3 more failed attempts, I went back to your recipe and again easy fool proof starter. I’ve made a couple of loaves since and the starter is alive and kicking.
I just wanted to let you know your doing a great job.
And thanks Mark
Hi Mark, Thank you so much for visiting and for the kind words!! YOU are awesome! So glad the starter is doing well!! Love, Mary
Does the starter need to float on water? I’ve seen that statement on other tutorials. Mine is 50 wheat & 50 rye. I’ve got lots of bubbles on top and on the side and it smells quite sour. It does not float though, even after 5 days in.
Hi John,
Thanks so much for your note. To me, your starter sounds like it is ready to bake with. I am not familiar with a “floating” starter but from what you describe – bubbly and sour smelling – your starter sounds perfect. And a wheat/rye starter is going to be nice and strong. Please let me know if you have any other questions. I’m so happy to help! Love, Mary
What are your thoughts about using spelt berries instead of rye? I would freshly grind the spelt berries before making the sourdough starter.
Hi Julie, Thanks so much for visiting!! Great Question!! Yes, spelt will work. And especially since you are grinding it fresh – it should work especially well. Any of the grains in the wheat family can be used in place of rye – and they work especially well when they are fresh ground. Please let me know if you have any other questions. I am SO happy to help! Love, Mary
Is it ok to put the container of sourdough in cabinet above the refrig?
Hi Norma,
Yes. It’s fine to keep your sourdough starter in a cabinet over your refrigerator. That’s a nice warm place, and the starter should like it and do well. Just remember to make sure that the container is not airtight and remember to feed your starter everyday. If you need to take a break from feeding your starter, you’ll want to refrigerate it. If you want some ideas for what to do with your discarded sourdough starter each time you feed it, here is a link to my playlist of videos of what to do with discarded sourdough starter: https://www.youtube.com/playlist?list=PLkRuW3pBo2U09KJ3fwoO4ud9jpyS9FhiJ
Thanks so much for visiting! I’m so glad you’re here!
Love, Mary