If you’ve struggled with sourdough in the past, this baking secret will change all that. I call it “The Busy Mother’s Sourdough,” but it’s just not for busy mothers, it’s for anyone who is ready to give up with trying to make a sourdough starter and sourdough bread. Well, don’t throw in the proverbial towel…or should I say starter…just yet. Help is on the way!

Affiliates note: As an Amazon Associate I earn from qualifying purchases. My content may contain affiliate links to products and services. If you click through and make a purchase, I’ll receive a small commission. It does not affect the price you pay.
Table of Contents
How This Sourdough Starter Secret…Started!
Many years ago, I was a homeschool mom, and I was in a lovely social circle of other homeschool moms who all embraced the challenge presented in the book Nourishing Traditions by Sally Fallon. Fallon’s book challenged us to begin incorporating more traditionally prepared foods into our and our family’s diets. I like to think of this process as transitioning from a processed foods kitchen to a traditional foods kitchen.
One of the sweet moms in our group truly was a busy mother. She had six children but was determined to incorporate nourishing real foods into her family’s meals. And all was going well. Bone broth, cultured dairy, and ferments made regular, if not daily, appearances on her kitchen table. But one area of traditional foods alluded her. Sourdough! Does this sound familiar?
But she was a determined mom and was not ready to give up. So one day while reading the book Artisan Bread in Five Minutes a Day, she got an idea. What if she slightly modified the master recipe listed at the beginning of the book, and what if she tried to coax her new creation into ultimately becoming a traditional sourdough starter? Would this modified recipe help her get around all the problems generally associated with trying to get a new starter going?
Sourdough Starter Success!
What my friend discovered was, yes, she could coax her original little mixture into eventually standing on its own two feet and rise her dough without any additional packaged yeast. Her dough would just use the yeast that was multiplying in her container. She kept her mixture in the refrigerator, and in essence, never fed or discarded her mixture in the traditional sense of what we think of when we think of sourdough starter.
With each loaf of bread she baked, her starter became stronger and stronger, creating a better loaf of bread each time. Subsequent loaves rose better and benefited from a stronger sourdough flavor. She was thrilled with her method and never looked back. And she and her family have been eating sourdough bread ever since. Success!
Now It’s Time for You to Create Your Starter
For a step-by-step tutorial to help you create your own “Busy Mother’s Sourdough,” be sure to watch my recipe video. But in the meantime, I’ll let you in on a little secret…this could’t be easier…and anyone can do it!
You create a very wet no-knead dough—with a little twist to the ingredients—that’s going to live in your fridge and produce some of the best bread you’ve ever had. And for the written instructions to follow along with the video, be sure to check out the printable recipe.
More Sourdough Videos
Now that you’ve made your own Busy Mother’s Sourdough, and you’re feeling confident to make a traditional sourdough starter, be sure to check out my Complete Sourdough Starter Guide and How to Make a Foolproof Sourdough Starter videos.


Afterward, try your hand at the easy no-knead and other sourdough bread recipes below. Each recipe has an accompanying video to walk you step-by-step through the process of making great sourdough breads!


Download Your Free 36-Page Pantry List
For an extensive list of the traditional foods you can make and purchase to stock your pantry, be sure to download my free 36-page Traditional Foods Pantry List. This comprehensive eBook is full of links to recipe videos, helpful articles, and more!

And if you’re looking for a printed book full of my traditional foods recipes to show you how to create a traditional foods kitchen, be sure to order your copy of my bestselling book, The Modern Pioneer Cookbook.

Order YOUR COPY Now!
The Modern Pioneer Cookbook
Seasonal ingredients, traditional techniques, and nourishing recipes. Over 85 traditional, from-scratch recipes! Discover for yourself how you can use simple ingredients and traditional techniques to cook the modern pioneer way.
Stay in Touch with Mary’s Nest
- Subscribe to My YouTube Channel for Traditional Foods Videos (Free) - When you subscribe, be sure to click on the notification bell that will let you know each time I upload a new video.
- Subscribe to Mary’s Traditional Foods Newsletter (Free) - Get a free 36-page eBook for signing up: How to Stock Your Essential Traditional Foods Four-Corners Pantry.
- Join the Traditional Foods Kitchen Academy - For more detailed videos and exclusive members-only perks, join my YouTube membership community.
- Order The Modern Pioneer Cookbook - Get a hardcover book of Mary's nourishing recipes from a Traditional Foods Kitchen. This bestselling cookbook is published by Penguin Random House with their DK imprint.
- Order The Modern Pioneer Pantry - Get Mary's latest hardcover cookbook about preserving food and making delicious meals from your Four Corners Pantry. Mary's second cookbook is also published by Penguin Random House.
I look forward to having you join me in my Texas Hill Country Kitchen!
I’d like to receive more tips and recipes from Mary’s Nest.
Busy Mother’s Sourdough Secret
Equipment
- Medium to large food safe container with lid
Ingredients
First Mixing
- 3 1/2 cups All-purpose or bread flour Do not use whole grain flour for this first attempt.
- 1 1/2 teaspoon Salt
- 1 1/2 cups Water More water may be needed
- 1 tablespoon Sugar
- 1/4 teaspoon Packaged yeast Active dry yeast or instant yeast may be used.
All Subsequent Mixings
- 3 cups All-purpose flour or bread flour
- 1 teaspoon Salt
- 1 tablespoon Sugar, optional
- 1 1/2 cups Water More water may be needed.
Instructions
If using active dry yeast
- If using active dry yeast, add sugar to water and sprinkle yeast into the sugar and water mixture. Mix and set aside.
- Mix flour and salt together in a food-safe container.
- Add water/sugar/yeast mixture to flour and salt in the food-safe container. Mix all ingredients together in the container to form a wet, sticky dough. Add more water if needed to achieve this consistency. (See video.)
- Put a lid on the food-safe container and refrigerate.
- The dough can remain in the refrigerator for up to one week. (See recipe notes below.) When ready to bake bread, remove 3 cups of dough from the container, leaving 1/2 cup of dough in the container. Proceed with the desired recipe to bake your bread of choice.
- Refresh 1/2 cup of dough in the container by adding 3 cups of flour, 1 1/2 cups water, 1 tablespoon of sugar, and 1 teaspoon of salt to container. DO NOT add any additional yeast. Mix all ingredients together to form a wet, sticky dough. Add more water if needed to achieve this consistency. (See video.)
- Put a lid on the food-safe container and refrigerate.
- Repeat this process every week. At some point, you may decide to omit the sugar if you find that the dough has taken on a strong sourdough component and no longer needs the sugar boost.
If using instant yeast
- If using instant yeast, add all dry ingredients to a food-safe container and mix well.
- Add water to the dry ingredients in the food-safe container and mix all the ingredients together to form a wet, sticky dough. Add more water if needed to achieve this consistency. (See video.)
- Put a lid on the food-safe container and refrigerate.
- The dough can remain in the refrigerator for up to one week. (See recipe notes below.) When ready to bake bread, remove 3 cups of dough from the container, leaving 1/2 cup of dough in the container. Proceed with the desired recipe to bake your bread of choice.
- Refresh 1/2 cup of dough in the container by adding 3 cups of flour, 1 1/2 cups water, 1 tablespoon of sugar, and 1 teaspoon of salt to container. DO NOT add any additional yeast. Mix all ingredients together to form a wet, sticky dough. Add more water if need to achieve this consistency. (See video.)
- Put a lid on the food-safe container and refrigerate.
- Repeat this process every week. At some point, you may decide to omit the sugar if you find that the dough has taken on a strong sourdough component and no longer needs the sugar boost.
Notes
Shop for items used in this blog post or video
Favorite Baking Supplies
- Baking Apron
- Rubbermaid Food Container
- 10-Piece Glass Bowl Set
- Danish Dough Whisk
- Wooden Scraping Spoon
- Plastic Bench Scrape
- Metal Bench Scrape
- Metal Loaf Pans
- Glass Loaf Pans
- Cast-Iron Dutch Oven
- Baking Stone
Favorite Baking Yeast Supplies
- SAF Instant Yeast
- SAF Premium Instant Yeast
- SAF Gold Instant Yeast
- Red Star Active Dry Yeast
- Fleischmann’s Active Dry Yeast
- Bob’s Red Mill GLUTEN FREE Active Dry Yeast
Amazon Shop and Shopping Guide
- Visit Mary’s Nest Amazon Shop
- Visit my Shopping Guide page
Get up to 15% off for stocking your Traditional Foods Pantry and equipping your Modern Pioneer Kitchen, including discounts from US Wellness Meats, Farmhouse Teas, Backwoods Home, Masontops, Cultures for Health, Survival Garden Seeds, Redmond Real Salt, Mother Earth News, and More!


You are great in presenting your recipe. I enjoyed watch you. I have been searching for a good sour dough recipe. I really like the one I saw on the video. I just made a batch. I measure 1/4 teaspoon of active yeast, it didn’t look like the same amount in your video. So I added the package, which was 1/4 ounce. Hope it works.
Hi Jo Ann, Yes, I only added 1/4 tsp but I’m sure that yours will work out OK. Love, Mary
Thank you so much Mary for this wonderful “short cut”. Made my first loaf in a loaf pan and husband, son, and daughter-in-law lives the way it turned out. It actually turned out like English muffin bread.
Beginning to prep to bake 2nd loaf a little over a week from starting the dough.
The last loaf didn’t rise quite as far as I was hoping it would and I allowed it to proof for almost 2 hrs.
So I am going to see how this one does. Both have had lots and lots of bubbles. Looks and smells delicious.
Oh no! My sourdough comes out too “doughy” to eat. This is my third baking. It doesn’t seem to be rising at all. After baking I put it in toaster oven to see if it would become more bready, but no luck. Any advice?
Hi Holly, Hmmm…let’s diagnose this. What are the conditions in your kitchen, the weather outside, etc? All of these things can play a roll in baking bread. This is new to me too, so I am doing a lot of experimenting and learning as I go. Are you in our FB group – Mary’s Nest Modern Pioneers? Post your questions and pictures there and hopefully we can all figure this out together: https://www.facebook.com/groups/171869080205145/?source_id=210509998974645
Love, Mary
I has been almost 24 hours and my Busy Mother’s Sourdough recipe dough has not risen but a fraction.
Is that normal and can the dough be used if doesn;t rise?
Hi Joyce, Great question. Try leaving it on the counter for a few hours and see what happens. Hopefully, it will start to show some activity. Then you can try baking with it or put it back in the fridge and try baking with it tomorrow. Keep me posted. Love, Mary
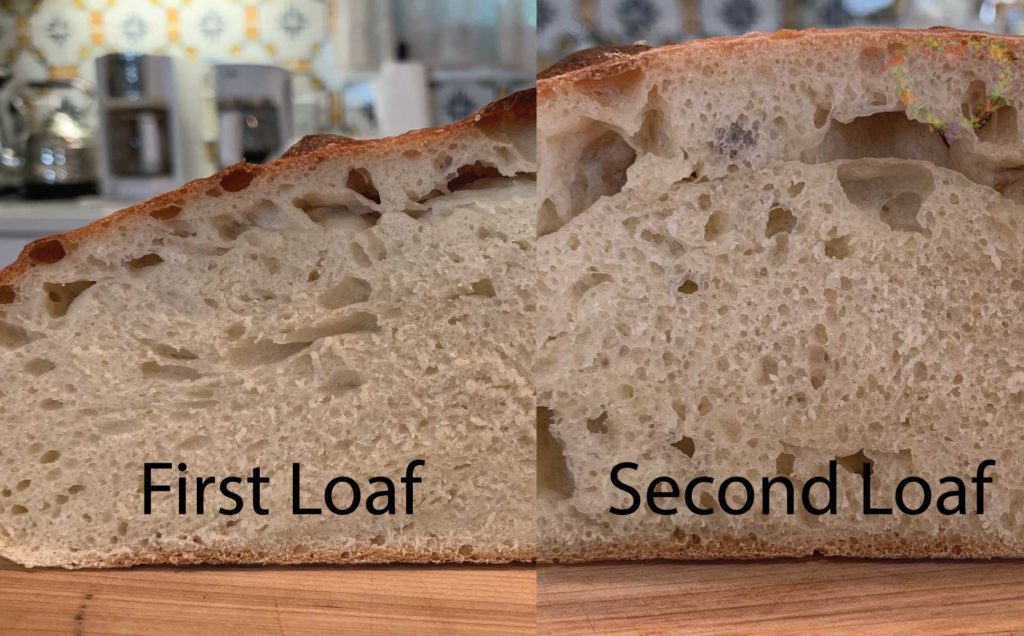
Please note that the “first loaf” I refer to above is made from Mary’s Busy Mother’s Sourdough Starter. Please note that the bread does not have a sourdough taste at all but it is wonderful and hopefully will develop more of that yeasty sourdough flavor with age and maturity.
Hi Dana, Yes, that is what my girlfriend said…that over time, the flavor got more sour. Keep me posted on how it goes. Love, Mary
I have been making Jim Lahey’s recipe of no knead bread to which this recipe is based for months. However, I have to say, that my first loaf, after a 3 day rise in the refrigerator (but having taken it out each day for a half hour or so on my counter to collect other potential yeasts), produced a fabulous bread with a much softer crumb and crust. I normally weigh my ingredients but just went with your scooping method for my AP flour as I still cannot procure KA bread flour (although I did weigh just to see how much a one cup scoop varied from my normal 120 g weighed cupn; for discussion purposes, it was quite a bit more quantity but it worked perfectly), cool water, SAF active dry yeast, 3/4 T King Arthur Gluten, and I used Zulkan brand Morena Pure Cane Sugar (unbleached) and a little more than a cup and a half of water. This was our favorite loaf of bread yet! We used parchment for the 2nd rise and lowered onto a hot baking steel with a pan of water in oven. Hopefully, this method will continue to produce a wonderful loaf of bread. I think I am going to do as Mary suggests and play with it a bit….perhaps a small pullman pan next time. Thanks so much for the technique! As a side note for those that are unable to procure bread flour, we have tested, numerous times, addingn approx 1 T. Bob’s Red Mill Gluten to a loaf of bread vs approx 1 T King Arthur brand Gluten and we, hands down, prefer the King Arthur brand of gluten.
Oh Dana!! Thank you so much for sharing all of this and I am so happy to hear that you enjoyed the bread!! Love, Mary